Wayne's world of Audio - Fascinating Tech Magazine Archivee
Main menu:
Wayne's world of Audio
Archived Issues > Summer 2015
 Making Music
with Wayne Watson
In this issue Wayne gives the second part of his look at Magix's amazing but complex Music Maker product. Any good music program needs a keyboard and Wayne bought one from M-Audio to do the review - he liked it so much he decide to review it as well.
Magix Music Maker 2015 Premium
Summary
In use, the wide variety of tools and plug-ins available allow for a huge amount of flexibility and customisation that a user may need. This, bundled with the music generation wizards, should allow most people to get up and running in short amount of time. After a few days solid work, I started to get a feel for the potential that the tool could provide... VAST.
However, there were a few downsides too.
The plug-ins have wildly varying layouts and sometimes it was very difficult to find the most basic of functions (start \ stop \ record) that a novice user like myself would need. Once found, they were easily accessible the next time round (most of the time).
Some plug-ins made it difficult to find the options and controls as the text blended in to the background too much and looked like background decals - the Celtic Harp was a case in point where the distortion function initially appeared as static text
In addition, some of the functions did not work immediately - The BeatBox2 plug-in needed the STOP button to be pressed a couple of times on loading before the PLAY button worked.
These may be issues with the plug-ins themselves, but the main product also has a few issues itself including:
· the keyboard short cuts didn't always work,
· the midi keyboard got 'lost' needing a program restart
· being 'too-helpful' at times by aligning blocks of work or sounds in the wrong place
· struggling with even low quality video - With audio set as priority, it still stumbled and jerked along at times.
Product Details For Part 2
· Software Magix Music Maker 2015 Premium
· Version 21.04.50 (UDPP3) - Up from 21.0.2.33 (UDPP3) used in part 1
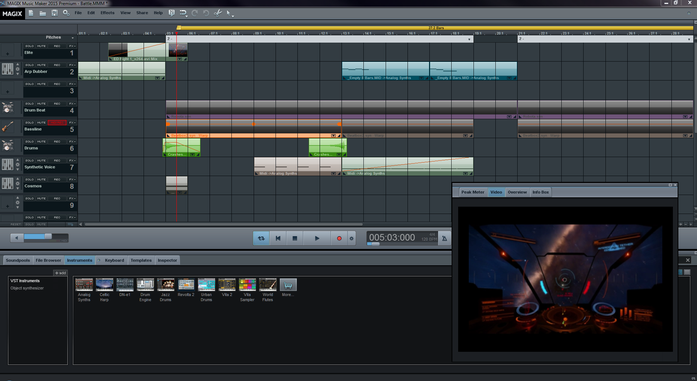
The Interface
There are 5 key areas of the main interface, with other instruments and plug-ins providing additional UI's, dialogues, and messages.
· Menu & tool bar across the top - Provides access to the common main UI commands
· Track headers to the left - Provides access to tracks and instrument functions
· Main arranger in the centre section - containing the music elements
· Transport control - Underneath the main panels allowing play \ stop and other functions
· Bottom panel - provides quick access to sound-pools, instruments and other items
A floating 6th panel can be brought up at any point to display
· Peak \ volume meter
· Video (if included in the composition)
· Overview showing a small section of the main transport area
· Info box showing hints and tips on some of the selected items
The areas are pretty self explanatory and easy to understand, and the menu functions are logically grouped together. A nice touch is the mouse-mode icon where you can pin a command or function to the mouse for the duration of its attachment - Move, Draw, Split, Stretch, etc...
The Help
There is a wealth of information in the well laid out help system. All of the functions reviewed had good help text and images with good links to additional sections where appropriate.
The Help menu also has links to online help and videos, with the latter being quite useful to hilight some of the functions in use.
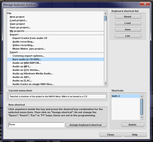
Pressing alt+f1 switches the mouse to context help mode, where a click on an area of the screen or on a function launches the help system for that particular area.
The Interface Panels
Menu
 The menu bar and tools contain a fair number of options, all reasonably laid out and easy to access.
 In addition, some of the menu functions are supported my keyboard shortcuts (ctrl+6 enables mouse "split" functionality, B bringing up master audio effect rack ... etc).
The user is also able to create their own shortcuts and assign them as they see fit.
Track Header
 The track header provides easy access to the instrument(s) associated with the track, and some useful playback functions (play solo, mute, add effects). If using midi instruments this allows you to do a number of things including the swapping out the instrument for another while retaining the same notes and meta-data for that track.
 The FX control allows for some post-processing of the track as a whole, regardless of what appears in it.
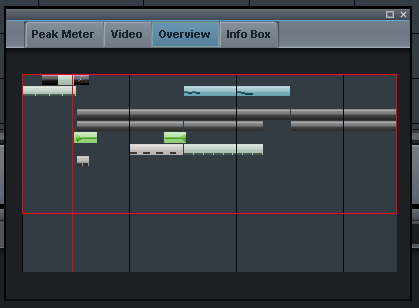
Arranger
This is where the imported, copied, created, or "wizard-ed" samples and arrangements appear. Each track and instrument comes with predefined colour schemes to help distinguish them from each other while, depending on the zoom, the contents of each show a wave form of the enclosed sound object to help identify and position them. During playback, a red line moves across the composition to identify where in the track the current sound is playing. If the track includes a visual element, some key frames will be displayed along the composition, while video playback is shown in the video floating window (if it is enabled). Note that video playback may interrupt the overall composition playback, even if it is set to low priority.
Transport
This controls the overall play back and pause of the whole composition. It also allows for direct recording of midi against the current track, and clicking on the 'cog' brings up the Audio Recoding dialog where line in \ out, and other settings can be made. The slider on the left adjusts the overall total volume of the playback, and the icons on the extreme right brings up the master track mixer and the floating menu panel.
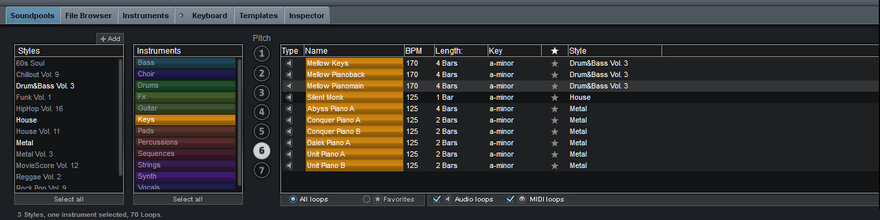
Bottom Panel - Sound-pool
The included samples are grouped into sound-pools that contain related styles (Soul, Metal, House), sub-divided into instruments (Bass, Drum, Pads), containing riffs, intros, short and long sounds and repeats. Additional samples can be purchased from a number of sources, or the user can include their own. The system will also allow the searching and inclusion of other sounds when needed.
Bottom Panel - Browser
This panel allows the user to select, and store, other locations that can be used by the program - Sounds, extracts, video elements for a project for example. It provides quick access to common elements that do not appear in the sound-pool tab and can be customsed by the user. It also acts as a standard windows navigator to allow the user to find elements for the current composition.
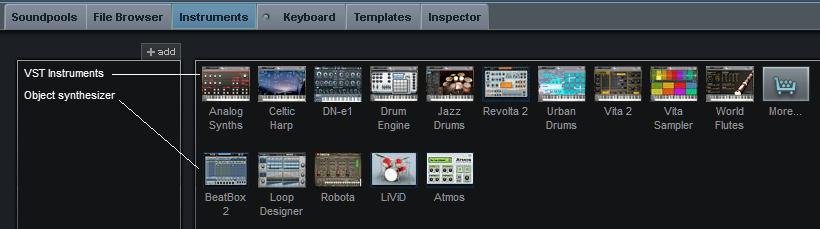
Bottom Panel - Instruments
This section provides an alternate way to access the plug-ins and other instruments that can be used by MMM2015. In the premium version, there are 10 VST instruments, and 5 object synthesizers that can be accessed and programmed. This is where more adventurous users will move to once the standard sound-pool samples become restrictive.
Bottom Panel - Keyboard
If the user does not have a midi keyboard attached, the virtual keyboard can be brought up to assist in the creation of the composition. It's a useful tool, but for the sake of ~£30 or so, it is probably worth buying a small keyboard (such as the M-Audio Keystation mini 32) to make life a lot, lot easier.
Bottom Panel - Templates
The templates panel provides access to a pre-compiled set of effects that can be applied to the composition. In addition, the user can create their own and save here for use in other compositions.
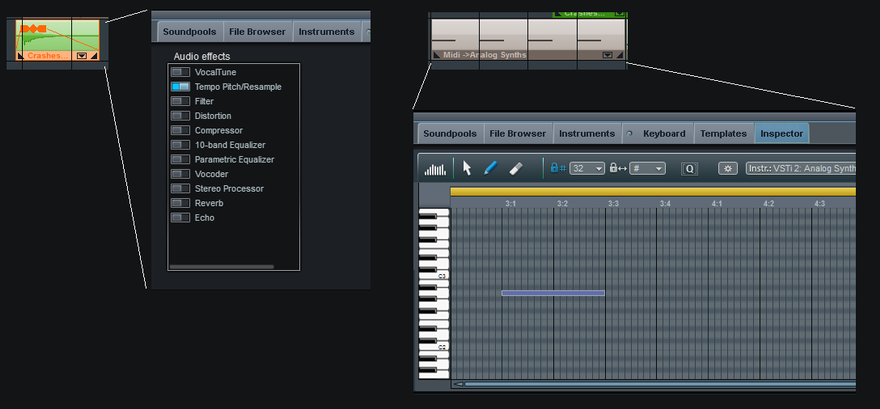
Bottom Panel - Inspector
This last panel provides access to further details and actions for a selected object. Click on a sound-pool sample and the inspector shows a list of available audio effects; click on a midi sample, and the inspector shows the midi track
Floating Panel
The floating panel can be displayed \ hidden with F3 and provides access to 4 sub-panels of varying usefulness. The panel can be resized at will and floats above all other MMM2014 main UI elements.
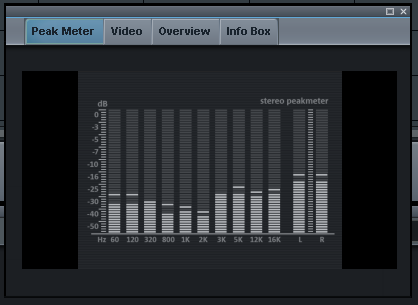
Peak Meter
The peak meter shows the overall volume \ peak of the sample during playback. This is useful to see where sounds are maxing out, and then using the track transport controller to adjust them accordingly.
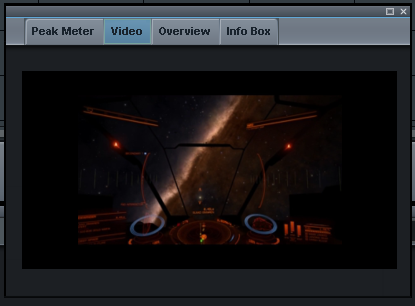
Video
If the composition makes us of any video element, then this panel can be displayed to present it. Playback seems ok for some small videos, but if the vide has a lot of transitions or splits in it (created with MMM2015) then it can start to de-sync badly with the audio. On one occasion, the desync was so bad that even when stopped, the audio items on the arranger were not where the system though they were - Selecting a midi element actually selected the one in the track below.
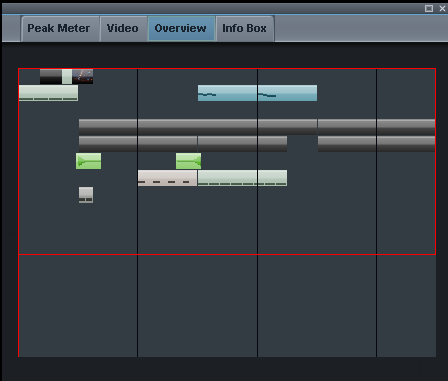
Overview
This third panel displays a summary of the arranger window for the segment being played. Whereas the arranger window can be zoomed in and out to show all or some of the arrangement, the overview window shows the complete arrangement
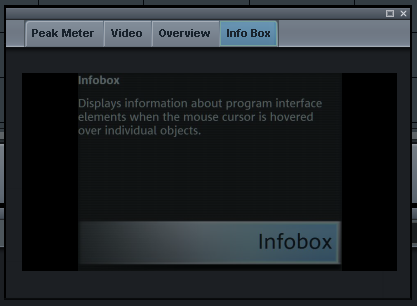
Info Box
The aim of this box was to present help on the item selected. It was rarely used due to the fact that during playback, especially with video, the content kept flicking between the InfoBox purpose and the arranger help information.
Audio Sequencing
This is the part of the tool I used a number of years ago and one I think most newcomers will gravitate to. The product comes with a number of pre-recorded samples in the sound-pool that can be dropped onto and repositioned in the arranger. With a number of complimentary (or otherwise) samples in place, the user can stretch them, cut them, reverse them or otherwise manipulate them to come up with the arrangement they require. The controls are more or less intuitive with ctrl+click \ drag being used to copy an item, and click-dragging a rectangle over a number of items (or shift-clicking individual ones) to select more than 1.
Samples can be dropped anywhere, but good practice seem to suggest having 1 track per instrument to make sample management a bit simpler and easier.
By default, the sounds have a pre-defined pitch (octave 1 - 7), length (in bars) and BPM. When selected the pitch can be adjusted \ selected to fit the overall composition - This is an improvemnt over the older version of the product I used as there, each pitch had its own sample, leading to numerous copies of the item being displayed, with only the key in the sample name being the distinguishing feature.
Samples can be previewed by clicking on them and it will loop until the user selects another or clicks on the sample again. The only way to hear two samples running together is to drop them on the arranger.
Once a sample is dropped in, a number of effects and other post-processing options can applied to it, or to the whole track:
- ctrl+shift+r = Reverse the selected sample(s)
- e = Launch the audio effects rack, where it can be compressed, stretched, filtered...
- Right Click and select Harmony and Vocal Tune wizards etc...
- Click on fx on the track header and apply wide ranging filters and effects
To play the composition, the user only has to press the space bar, or click on the play icon on the transport. Two markers at the very top of the transport shows the start and end positions (so can set it to play a small part of the arrangement) and a red bar moves between them showing the current playing position. Note. Clicking on STOP will reset the transport bar to the start position. If you want to stop the playback at a particular position, then you need to press PAUSE.
Song Maker
MMM2015 comes with the ability (keyboard W) to create a composition from scratch based on some user input to define the style, instruments and components to build. Very useful if stuck in a rut.
Midi Composition
This is the area that I wanted to focus on as:
- I explicitly wanted to avoid the use of pre-supplied sound-pool objects
- I have no knowledge of midi
- I have ideas above my capabilities in composition
- I'm up for a challenge
The VST instruments
With all of the following instruments, they provided a varying degree of usability and feedback, and some had many more presets than others. Almost all came with one or more loops \ riffs so you could hear the sounds in context, but the overall aim of each was to provide the user with a starting position with regards to sound, tone, flavour of the instrument that they could then take into the midi-editor to fine tune and tweak, and to make their own compositions.
With Vita2 and a few others, it was very easy to use the sample as provided without using the editor to create my own composition.
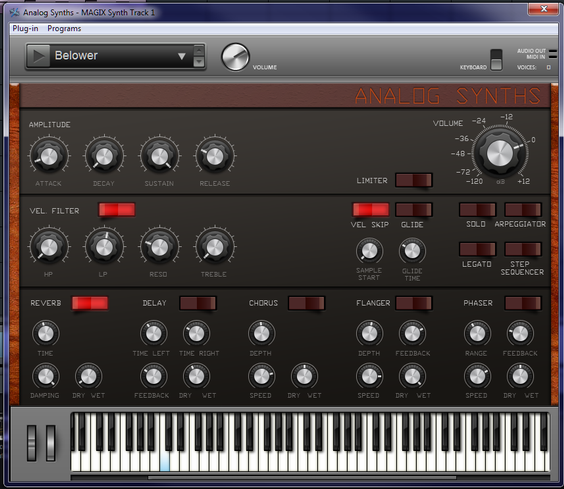
Analogue Synth
This was the first instrument used, and the reason for buying a midi-keyboard. Although the UI was neatly and logically laid out with clear controls and values shown, interacting with the virtual keyboard was annoying; a real, physical device seemed a good buy.
On the UI itself, simple rotational knobs, and toggle switches were in abundance, and the huge selection of pre-defined samples were a good kick off point, providing some useful themes and riffs that could be adopted and changed to fit my needs. Once a sound \ envelope was identified, it could be exported as a patch or bank for future use (Note, I am not 100% sure of the difference between a patch and a back - I may find out before publication). Each of the 13 categories of sounds had a number of pre-defined settings that were easily identified and accessible -
- Basses - Baloney, Dark Bass, Knarzer ...
- Atmos - Cavern, Fear, Glass-world ...
- Over 200 more .... (I especially like the sound of the Organs - Drawbar Organ....)
-
Changing parameters on the fly was easy and immediate but the use of the midi-keyboard made playing notes a lot easier, especially when it came to chords and multiple \ quick changing keys.
Celtic Harp
 The Celtic Harp interface was not as immediately easy to use as the analogue synth, but after a few practice runs, it became easier. As expected, the sounds emitted were that of various harp types - Acoustic, or Electric, each with Cathedral, Space, and Robotic themes amongst others for a total of 16 pre-defined defaults. Each default could be adjusted within the UI itself to tweak the sound to your own need. The key issue here was with the poor layout of the controls, with elements blending into the background too much, and the fonts being very small.
DN-e1
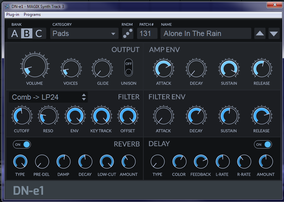 The DN-e1 synth produces a varying assortment of electronic sounds and riffs that can be used for the lead tune, or as an accompanying theme. It had a nice UI with a flat 2-dimensional approach to dials and switches.
 There are no play \ stop buttons shown, but instead relies on the space bar being pressed to start \ stop the sample.
With over 380 pre-defined programs, all of which can be tweaked, three banks to program, and a randomizer function, there is a huge amount that can be composed here.
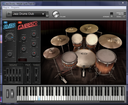
Drum Engine
 This was fun to use - over 50 pre-defined samples to start off with, that could all be tweaked or controlled to produce the drum line that was required. Control could be via the virtual drum-pad that was displayed, or the virtual keyboard. I opted for the physical keyboard which was undoubtedly easier, but maybe I should have spent a few pounds more for the keyboard that had an 8-pad drum-pad included...
Jazz Drums
 The jazz drums didn't get much attention - I am not a Jazz aficionado - but when it was used, the sounds were clean, crisp and matched the name of the 30+ default programs it came from.
Control wise, you could use the virtual keyboard, or click on the drum images directly to trigger the sound. Again, a drum-pad may have made life a little easier.
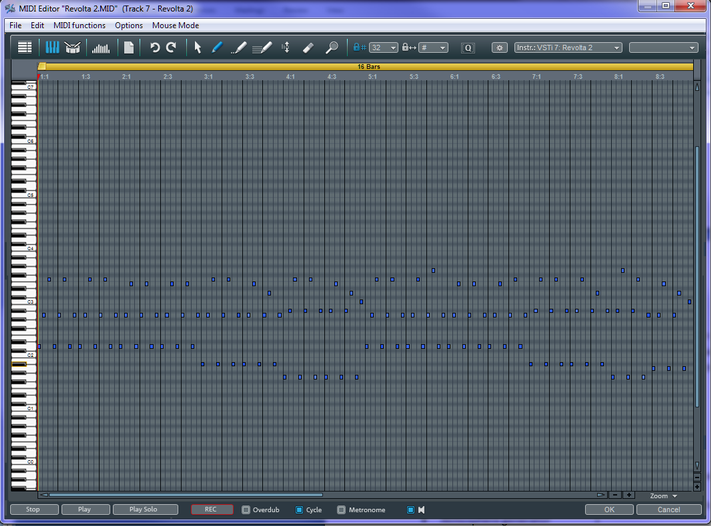
Revolta2
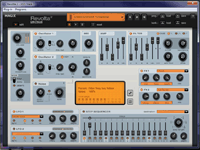 I lost a good few hours here - The sounds were brilliant, the riffs enticing, and the overall experience thrilling. As with the DN-e1, there were over 380 pre-defined sounds \ samples, with ~60 controls that could be tweaked and controlled to adjust the wave-form, amp, panorama... and to increase \ decrease the number of steps played.
 Once the right sound set and sample was found, the notes and steps could be edited, changed, and replayed until it was perfect.
Urban Drums
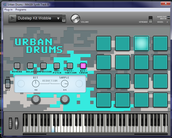 Very similar to the other two drum machines listed above - The layout was cleaner with 16 virtual drum pads to interact with and 9 controls to affect reverb, distortion and room size amongst others.
Vita2
 Vita2 provided a good set of simple sounds and loops, from orchestral French Horns, to flanged Power cords. Basic ADSR envelope could be adjusted, along with panorama. velocity, and reverb.
Sounds were again true to their name with the guitars sounding especially electric, and the acoustic piano sounding very rich with some nice reverb and sustain.
Vita Sampler
 A weird one - Instead of the expected synth type arrangement, this device takes in some pre-defined samples, chops them up and inserts them into a track where you can loop them or reverse them. This was the one device that I could not control with my midi-keyboard nor find a use for (with my current (low) skill level).
World Flutes
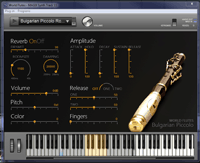 Similar to the Celtic Harp, this synth specialises in reproducing flute sounds, from the Bulgarian Piccolo, to the Xiao flute, via Kiowa Native American Pipes. The sounds are crisp and sound accurate, with "breaths" being mentally inserted between bars. There is a distinct difference in sounds between the various types of flute, and each will have their place in the appropriate composition. The only issue is that it does not like defaults being selected on the fly while the sound is playing - Unlike the others that either stop, or switch to the new sound immediately, the flutes loop \ stick on a few notes before recovering. Again, not an issue as these panels and UIs are there to help you select and tweak the sound you require. The composition comes in the midi editor.
The Object Synthesizers
Like the VST instruments, these allow the user to select the sounds and samples they like, which they allocate to a channel and then post process. Unlike the VST instruments, there is no midi-editor associated with these synths. Instead, the samples and loops are generated within the toll itself and then placed onto the arranger. If a tweak is needed, a copy of the synth object is copied and then edited.
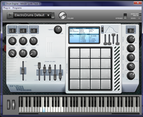
BeatBox2
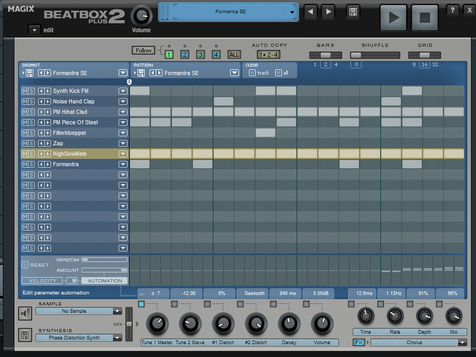
The second most used panel for me - A large number of starting samples that can be tweaked and modified to produce the bass or melody line you wish. with 16 "tracks" and a large number of samples and instruments to choose from, its a mini MMM2015 in its own right.
Once the beat has been laid down (I'm hip), the individual notes and tracks can be further refined with the parameter automation controls at the bottom of the panel. In addition, the number of bars can be increased (1-4) and the bar zoomed into via the "follow" command.
Each of the tracks can have their instruments changed on the fly and the change takes place immediately, providing excellent feedback on the composition at that point.
Once the composition is finalised, it can be saved as a bb2set file for later reuse.
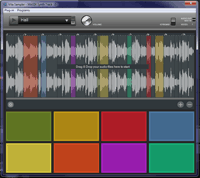
Loop Designer
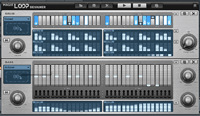 The Loop Designer is a drum and bass loop editor that, like the BeatBox2 synth, has a huge amount of loops that can be selected as a start position, then edited to finalise the composition. A neat feature is again the randomizer that can affect the drum, the bass, or both. Some of the results are a bit off the mark, but others are pretty good.
It has a different layout to that of BeatBox2, but there are similar elements - a transport that shows where in the loop you are and adjusters for per-beat tweaking.
The controls are straight forward but quite powerful allowing for the creation of some complex loops.
Robota
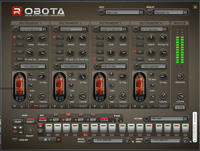 Robota is a drum synthesizer that has a large number of default patterns (rhythms), setups (sound banks) and kits (sounds) available and with a wealth of configurable items to get the loop you require. On a 27" 1920 x 1080 monitor, some of the functions are a little hard to click ok, and selecting some of the predefined values can be hit-and-miss, but overall the synth is nicely laid out albeit with some small controls. The sounds generated are nicely mixed, with up to 4 instrument banks (but 8 instruments) available to control at any one time. This is a much more advanced instance of the VST drum sets detailed above.
Livid
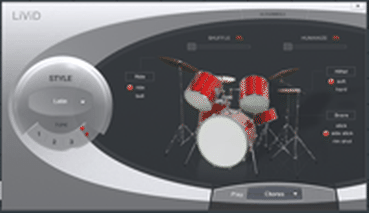 This drum machine, on the surface at least, appears to be the (2nd) least configurable item in the whole suite of VST and Synth instruments. The panel is very simple, with none of the dials or switches that the Robota has, but the interface allows you to select any combination of:
- 4 styles (pop, rock, funk, latin) with
- 4 sample types (1 - 4)
- 6 loops (intro, verse, bridge, chorus, outro, and fill-in)
- 3 instruments with 2 or 3 options
o ride = ride or bell
o hihat = soft or hard
o snare = stick, side stick, or rim-shot
...giving a total of 3,456 individual loops or samples.
The key issue here is that there are only 4 styles (or patterns) to start off with. If this suits your needs then it's possible that this is the only drum machine you will need.
Atmos
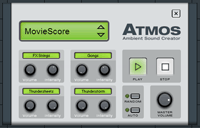
This is the smallest \ most compact synth in the suite of synths in MMM2015. Its aim is to provide some atmosphere for you composition, made up from a selection of 4 "flavours" each with 4 components with different sounds based on the intensity selected ...
Ambient
- Creek - gentle stream, to huge outpouring
- Jungle - whoops, howler monkeys, chatter, warbles
- Summer - bird-song, buzzing, swarm
- Wind - zephyr, breeze, howl, storm
Chillout
- Evening - From crickets, through wolves, to wind
- Fire - From open camp fire, to inferno
- Ocean - From gentle lapping on the shore, to crashing waves on rocks
- Rain - From gentle drops on a leaf, through to overhead storm with thunder.
HipHop
- Adlibs - yeahs, yes, come-on, whoop
- City - Light to heavy traffic noise, sirens and exhausts
- Gunfight - Small-arms, semi-automatic, fully automatic, to large shells
- Vinyl - Cracks, pops, stylus knocks
Movie Score
- FXStrings - low buzz, loud strings, screeching strings
- Gongs - water drum, cacophony of metal drums,
- Thundersheets - low hum, buzz, drone, crash
- Thunderstorm - wind, gale, rumble, crash
Midi Editor
The midi editor is accessed once a VST midi instrument has been selected and tweaked from the available list. Here, the composition can be edited and played back either in isolation with the remaining (unmuted) tracks. A virtual keyboard is provided for those who need it, but it felt a lot easier using the mini midi keyboard purchased for this task.
The user can start recording notes (single or polyphonic) via the record key. Once done, the user is able to adjust and tweak the notes via keyboard and mouse - To move a note up or down, or to extend it so it terminates at the correct place for example. A large number of options are available to the user - some useful across all instances, while some are relevant to certain instruments, such as drums.
As this is a MIDI editor, the instrument \ sound back used to create it can be changed on the fly. If you want to replace the drum line with a Xiao flute, just select the instrument from the drop down.
As well as editing your newly created compositions here, you can load in any midi file that you have previously created or purchased from elsewhere.
Instrument and UI summary.
Overall we have a large selection of complimentary, focused, and \ or overlapping tools that should be enough for anyone's needs and skill levels.
The loop generators are mini MMM2015 tools in their own rights, while the others provide specialism and focused attention to particular instrument types (Drum machine, Harp, Flute).
There appears to be very little the application can't do.
Quality wise, the sounds are close enough to their real-world analogues for me and the software seems to work with only a few issues every now and then (mainly around the graphic refresh when some pop-up \ hover text leaves a permanent outline on the desktop (IE, minimise the UI and the bounding boxes for the pop-ups still remain on the desktop and any other window displayed))
Putting It All Together
I wanted to be able to create a composition using the midi tools available and without resorting to the use of sound-pools. To provide some focus I decided to use MMM2015 to provide a soundtrack for some Elite Dangerous videos I had captured with OBS (Outside Broadcasting Software). The overall plan was (and still is) to combine video elements with an appropriate selection of music created with this tool. Given the constraints of the tools in use (video formats, sound formats, work flow) this required some thought on the process, but the first track seemed good enough for me.
Over the next month or two I hope to publish out my videos and music to YouTube and will feed the experiences into the final review I hope to publish for the next instalment of FascinatingTech.
Links
Images http://knuks.net/reviews/Magix_Music_Maker_P2/
Sounds http://knuks.net/mp3/ED_Soundtrack_1-Vulture_1.MP3
Videos https://www.youtube.com/playlist?list=PLfsvzHXWqoutXqgXpmP16NTmEB1S3L4KE
Sounds http://knuks.net/mp3/ED_Soundtrack_1-Vulture_1.MP3
Videos https://www.youtube.com/playlist?list=PLfsvzHXWqoutXqgXpmP16NTmEB1S3L4KE
The video and sounds link take you to the first, I hope, of a set of compositions made with Magix Music Maker. In this first one, the video of In-Game-Footage from Elite Dangerous was captured, the sounds stripped out, and replaced with those generated by Magix Music Maker 2015.
If I recall correctly, all but two of the other samples in the Sounds Directory above were created with the Audio Sequencer part of an earlier version of MMM - Mofo2000 and benboogie were created in EJay.

M-Audio Keystation Mini 32
Summary
The M-Audio Keystation Mini 32 is a cheap, functional, and useful accessory for anyone starting out with PC based music creation or midi-based work. The 32 keys are a good size, responsive, and are velocity enabled allowing for fine control when playing notes. The 8 physical controls on the left provide quick access to key functions including octave adjustment, volume, and 'pitch bending', and are augmented by additional programmable keys on the keyboard. The mini USB connection provides a quick and simple connection to your PC without the need for midi connectors.
The midi-keyboard provides a much smoother and simpler interface to music production \ editing software than the default PC qwerty keyboard most users will start off with, and for around £30 it's a worthwhile investment even for the occasional user.
Product Details
· Unit M-Audio Keystation Mini32
· PC Drivers None required for this device - Class compliant
In the box
· 32 key, USB enabled, "midi" keyboard
· USB cable
· Details on how to access ignite software
· License key for Ableton Live 'Lite' software
· Quick start guide (6 languages)
· Warranty \ safety instructions
Testing Setup
The following setup was used while testing the devices capabilities.
PC
Intel i3-2120, 8GB RAM, Win7 64 bit Professional, 1TB HDD
Software
Magix Music Maker 2015
M-Audio Keystation mini 32
Keyboard
Monitors
AOC M2870V + AOC e2343f, both at 1920 x 1080
The keyboard does not place any demands on the hardware it is connected to, but the accompanying software does have minimum specifications. Most users will probably have enough processing power to handle it, but please check the minimum specifications before purchase.
Please note - I am not a musician. I know what I like (and its wide ranging), and I like to try (dabble with) new things. People who experiment with music will probably buy a fully functional, full size midi-enabled keyboard and the appropriate software. For me, this is just trying things out for a small outlay and with only a couple of weeks practice with the software and the keyboard.
Looks
The keyboard looks ok with 13 black keys, 19 white keys taking the majority of the room, with 1 volume knob and 7 rubber buttons on the left hand side of the keyboard. The M-Audio logo and model name are printed across the top of the unit and the programmable keys are indicated with appropriate labels.
When connected to the PC via the USB cable, the Sustain and Edit buttons are highlighted with a blue LED wash, while the Octave up and down keys are similarly highlighted in red. Pressing the Octave keys change the LED through green, orange, deep red, then flashing red to indicate which end of the octave range you are in. Pressing both together resets to middle C. Pressing the Sustain and Edit keys change their LEDs to a brighter blue to show they are active.
The USB connector appears on the left end of the keyboard and the supplied cable is long enough to connect it to my PC. The keyboard is slightly shorter than my PC keyboard and easily fits on my desk when I use both (the QWERTY keyboard and midi) with the music software,
Apart from that, there is nothing much more to say about the keyboards looks - It's easy on the eye, the LEDs are clear and not too bright, and the printing is easy to read.
Downsides?
The keys are nicely sized for me but I still find myself occasionally pressing two keys at once; I am certain that this is down to my lack of familiarity (coordination?) rather than anything else. I also (currently) think that the buttons on the left could do with being at a slight angle (towards the user) rather than being flat, but again, if I practice with the keyboard more I would probably get used to it.
Set up
Set up was pretty painless - Take the unit out of the box, connect the USB cable, and plug in to the PC. There was a brief "identifying new hardware" Windows pop-up that disappeared after a second or so, and the devices LEDs around the 4 main buttons lit up. No conflicts with any devices.
Conflicts \ Issues
However... I initially connected the keyboard to a 4 port USB hub that connected to a USB-3 card at the back of my PC. For about 10 minutes while using the Magix software, the device repeatedly connected and disconnected. After disconnecting the USB cable from the hub, and plugging it straight into the PC's front USB-2 port, the device was stable. I can't tell if this was an issue with the hub, a loose connection, or the USB-3 expansion card, but a direct connection resolved the issue
Drivers
There were no Windows drivers to load.
In use
Software Used
The keyboard was bought in order to interact with Magix Music Maker 2015 which will be reviewed over the course of a number of this web-sites issues. When using the audio sequencing capabilities of MMM2015 the standard keyboard and mouse functions work very well, but for interacting with the plug-ins and midi functions, the qwerty keyboard (and virtual midi keyboard) just didn't cut it.
I have not downloaded or tested the software that came as part of this keyboards bundle.
The keys
I like the keyboard itself. The keys are nicely spaced and sized, which allows me to hit the right keys the majority of the time (practice makes perfect). They have a nice resistance to them and pop back to their original positions quickly and easily when released. The black keys are easy to reach and have a similar feel and response to them although they (to me) seem to have a stiffer feel - This may be due to the fact that they are shorted so need a bit more effort to press.
The keyboard is fully polyphonic, with numerous simultaneous key presses being interpreted by MMM pretty well. I have not been able to test the maximum number of simultaneous key presses being registered, but MMM reported 16 inputs at one point.
Running your finger(s) up and down the keyboard shows that the keys do not stick or knock together, and they all release nicely.
Key velocity
This appeared to work fine and as expected, but is dependent on the MMM2015 plug-in being used at the time. Hit the key hard and the software \ voice responds with a sharp intense jarring start. Press the key gently and the voice starts quietly. All of this is further refined with the software voice envelope programmed in at the time (in MMM2015).
The buttons
The volume knob works as expected, and is partially overridden by the master volume control in the software; MMM2015 sets the master volume to ~ 75 of maximum PC volume. Set the keyboard volume to maximum, and you can control this further with the software volume control - All as expected, just remember it when using headphones- Nothing quite like a full volume (PC, Keyboard, Software @ max) deep bass rumbling through your skull unexpectedly.
The octave buttons integrated seamlessly with MMM2015, providing -4 \ +4 octave ranges centred on octave-0 (Middle-c?). They buttons were easily accessible and provided feedback (via LED washed borders) indicating the current octave.
The Pitch bend buttons worked as well, with a gradual pitch bend being applied up \ down as necessary.
Similarly, the Sustain button worked well by keeping the voice \ button active without the need for continually holding the button itself. In use I didn't see the MMM2015 software override the function.
Programming
The keyboard allows a number of the keys to be programmed to produce certain effects or hold other default values. Again, these functions were not tested during the review, but may be addressed later, along with the free software that was bundled with it.
Sum Up
It's a USB powered keyboard that does everything I want of it, and makes my interactions with MMM2015 a lot simpler. If I progress with more music creation (as I plan) I may look at more function rich devices.
M-Audio has a good name and some good products, so unless I run a "face-off" review, I may stick to M-Audio for now.
Links, Acknowledgements, and Disclosures
Disclosure
This review was performed against my own M-Audio Keystation mini 32 which I purchased to assist in my review of Magix Music Maker 2015.
Links