Garry's Smart Home on the cheap - Automated Curtains, Domoticz, Netatmo, Acer - Fascinating Tech Magazine Archivee
Main menu:
Garry's Smart Home on the cheap - Automated Curtains, Domoticz, Netatmo, Acer
Archived Issues > Spring 2016 Issue
 In this edition Garry looks at how to automate your curtains (even ones with poles rather than rails.) How to use a Raspberry Pi to control them and other devices. First, though, he looks at an addition to a system we have reviewed previously the Netatmo Weather Station.
Netatmo Wind and Rain Sensors

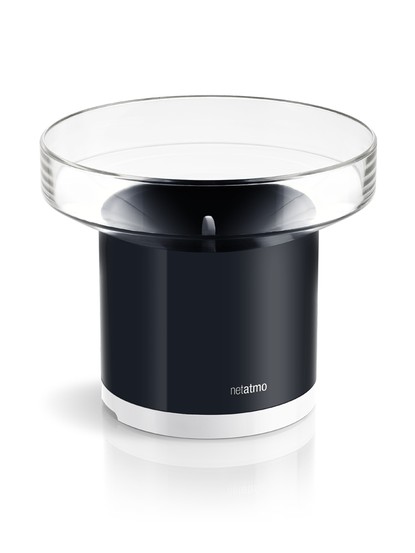
The first and most important thing to note about the Netatmo Wind and Rain sensor devices is that they are pretty useless on their own. They are designed as an add on to the Netatmo Weather Sensor system we have previously reviewed and won't work without one. To give Netatmo their due this is very clearly stated on the packaging.

We really liked the Netatmo Weather system consisting of an Indoor Temperature, Humidity and Air quality sensor coupled with an external Temperature and Humidity sensor when we reviewed it. We particularly liked how easy it was to set up and how well the Netatmo apps worked.
These add-ons are no exception. To install them you download an app from your PC and connect the smain weather device via USB tell it you are adding a sensor, follow the instructions carefully as to when to power on the sensor, and hey presto you will get sensor readings - well at least you will when you place the devices somewhere you get wind and rain.
The Wind sensor has a direction arrow which once pointed North allows the sensor to tell which direction he wind is coming from. We really liked the compact design of the wind sensor and how easy it was to mount - Netatmo supply additional mounting devices at extra cost but we found the unit easy just to place on a flat surface. We had it in use in one of the recent storms and it stayed put.
The sensor readings from the wind sensor seemed very accurate when compared to a nearby conventional weather station.
The rain sensor was a little more challenging it is basically a funnel with a tip plate. You have to ensure the plate has room to tip. We also found it wasn't very good close to walls. Sometimes registering no rainful in absolute downpours. Moving it into open space did work and it was then again very accurate.
One of the beauties of this system is as well as working with Netatmo's apps it works very well with many home automation systems. So you can do things like warning people to take a coat if your smart home is able to sense them leaving whilst the Netatmo is reporting rain.
All in all with the proper placement these are excellent and worthwhile additions to the Netatmo system.
Smart Curtains with Raspberry Pi and Domoticz

A few issues back I spoke about how I had used a Windows based Voice recognition system to automate my home - VoxCommando. This is truly excellent and works exceptionally well but what if you do not want to use your voice to command your home. What if say rather than a system that automates your control over your home you actually just want a smarter home that can work for you and what if you want to do that without spending a fortune.
This is one of the premises around this series. To be fair VoxCommando could be used to do everything we do in this issue but a number of people have told me they do not want a PC turned on all the time to control their home. Also if you are one of the generation that uses tablets and laptops instead of a desktop PC then you may not have a PC you can leave on 24 hours a day. Buying a PC just for this purpose is an expensive option until that is you realise there is an incredibly cheep type of PC that may not run windows but is actually built for the world of the Internet of things or as its often called IOT.
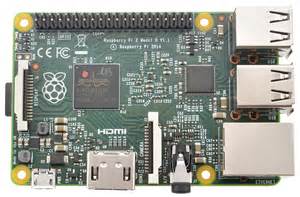
I am of course talking about the Raspbery Pi. Whilst this project could be done on any of the Pi variants, including the £5 Pi Zero, I chose the Raspbery Pi2 with its extra processing power and built in Ethernet and additional USB Ports. You could now also go for the Raspberry Pi3 which adds in Bluetooth and WiFi connectivity for roughly the same cost. At the time of writing both were around the 30 GB Pound mark brand new. I actually chose to go with the Pi2 because I had no need for WiFi and the Pi2 uses less power than the PI3. Neither is going to use a much power as a conventional disk based PC however -the Pi2 can be happily powered from a decent Smartphone charger - and this makes them great devices to run 24 hours per day = perfect for a smart home controller.
If all you have ever used on a PC is Windows then the Linux based Raspbery PI can seem a little daunting fortunately there are a number of Pi based home automation systems that come with ready built SD card images that you can write to an SD card using your PC. This may still seem a little daunting but if you follow the instructions carefully on the home automation sites it is pretty easy. This is especially true of our chosen software Domoticz. This efectively creates a web server running on your Pi (it can run on a PC as well if you don't want to go the Pi route) which you can then access from any other device in your home with a web browser.
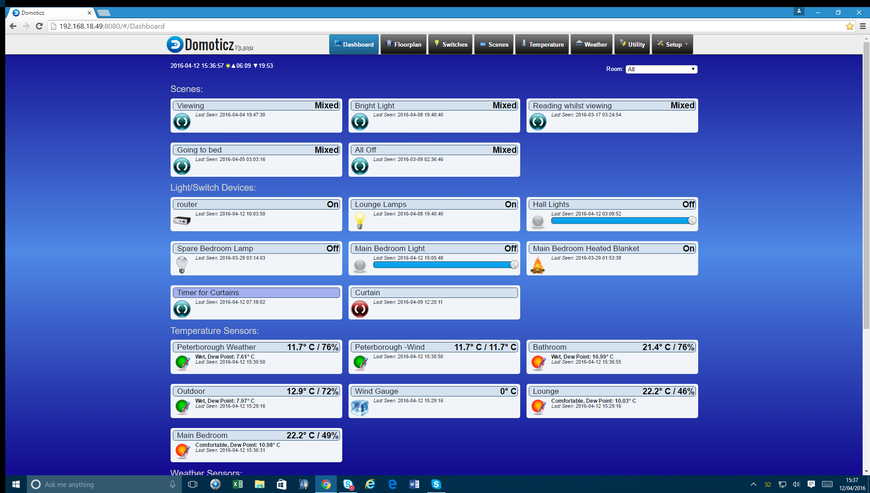
We chose Domotiz because of two factors - it is relatively easy to use with great community support and, probably more importantly, it supports a huge range of controllers including ones for 433Mhz switches like the HomeEasy and Bye Bye Standby units we used in our VoxCommando article, third party devices such as the Netatmo Weather station and Phillips Hue lights, through to ZWave devices such as the latest Fibaro and DLink home automation ranges
It also handles temperature and power sensors really well alowing you to look for example at graphs of usage over time.
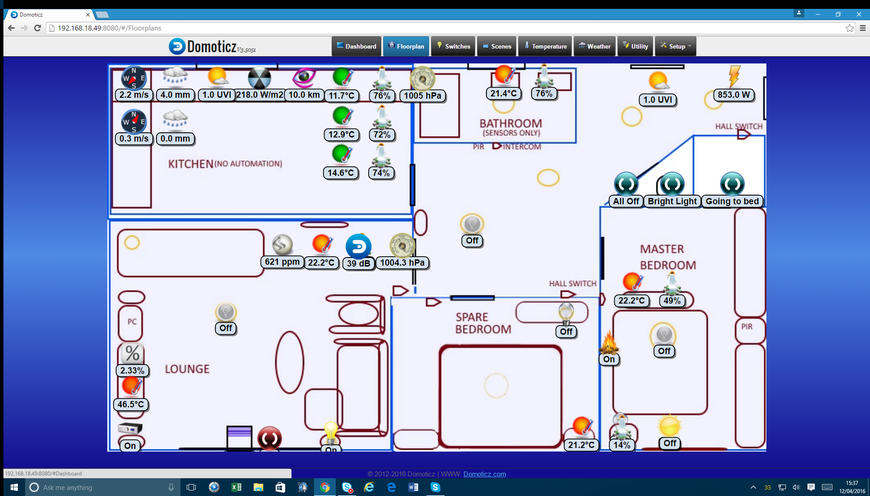
One of our favourite features is that it allows you to create a plan of your home and postion switches and sensors on that plan. This plan can then be accessed through a web browser. We've used this with cheap android tablets to create touch screen wall controllers.
The inspiration for this month's project came from an article in the local press where an arrested house-breaker had been interviewed to give up his tricks of the trade. One of the things he highlighted as a big giveaway of people being away from home was curtains being left closed in the day. Now people have used automated lighting to fool burglars that they are home for a long time with the simplest method being to put lights on a timer switch whilst you are away. I began to wonder if this was possible with curtains. Now there are a number of powered curtain products avaialble in the UK but the are invariably in the hundred of pounds they also usually rely on a curtain rail with runners. This latter was an issue in our test apartment as we have the poll and ring type of curtains.
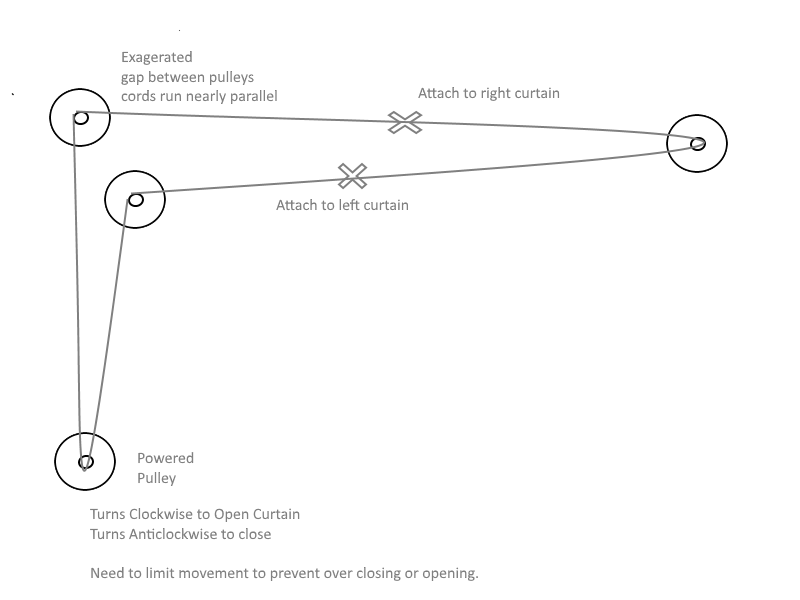
I finally came up with a possible solution using some pulleys cord and a motor. The first issue I had was getting my head round a cord arrangement that could be attached to the curtain rings to allow the two curtains to be pulled in opposite directions. It took me a while but I finally came up with a system where the string looped over one pulley at left end of the curtain pole round another single pulley at the right end of the curtain rail back over another separate pulley at the left end then down the wall to a motorised wheel and back up to the first pulley. This way the top run of cord moved right as the bottom moved left and vice versa. This is probably a lot easier explained with the aid of a diagram.
There were two difficulties I could see. 1 providing enought torque in the motor to move the heavy curtains and 2. limiting the range of motion so the system didn't try to pull passed the point where the curtains were either fully open or closed. We would also need some way of working out which way the motor should be turning based on whether the curtains were already opened or closed.
To further complicate matters we set a budget of 50 pounds for all the components. Whislt this sounds a lot my first attempt soon exceeded the budget. I initially tried using a stepper motor attached to the Pi. This seemed a logical approach as Domoticz has an interface to switch the General Purose Input and Output (GPIO) ports on the Pi. As the Pi can only switch 3.3V this involved having some additional circuitry to control the 12v motor I was using. There are several such motor boards on the market mainly used for robot control - we chose one for around 12 GBP. We burnt through a number of 12v motors before swiftly coming to the conclusion that we would need some sort of gearbox to lower the speed and increase the torque. We also needed to add a limit switch. All of this was starting to add up in time, money and complexity. Whilst frankly I enjoyed the challenge, I was coming to the conclusion that this wasn't something a non-electronics enthusiast would want to do.
Fortunately we came across a great answer on ebay.
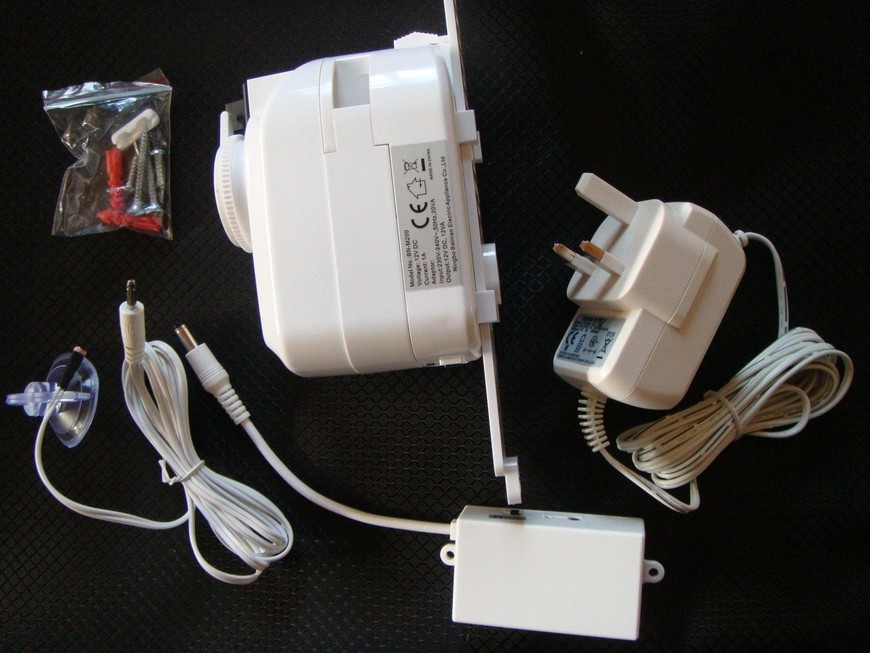
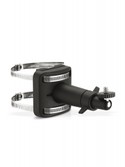
This kit http://www.ebay.co.uk/itm/Motorised-Electric-Curtain-Blind-Controller-RF-Remote-Control-and-Light-Sensor-/252354753372?hash=item3ac183f35c:g:RyUAAOxyB9RSzHFF is designed to move curtains and blinds. It comes with a remote control, has a built in adjustable limit switch and has an input for home automation. Most of all it was just £35.
Fitting it in our system was a doddle. The wall mount allows the motor unit to be raised and lowered thus allowing the cord to be looped over loosely and then tightened by lowering the unit. Keeping the cord tensioned is important for proper operation.
The limit switch on the unit acts as a toggle changing the directionthe motor turns on the next power off and on. The switch has an adjustable range and we were able to adjust this so that in one toggle position the curtains were just fully closed and in the other fully opened. The remote control is a toggle that switched the unit off and on so if switched on and allowed to reach the limit switch toggle it would have to be pressed once off and then on again to change direction.
 It should be noted that we could have achieved our aim of automatically opening in the morning and closing at night by just using the light sensor included in the kit but this limited the amount of control we had. We wanted to be able to manually control the curtains and also add some randomness into the opening and closing time.
We could have used the Home Automation contacts built into the unit to interface to the Pi but for our arrangement this meant running cable and there was an easier way. It turns out the Remote control unit used with the curtains is compatible with LightWave RF and HomeEasy controllers and will register them when put into learn mode.
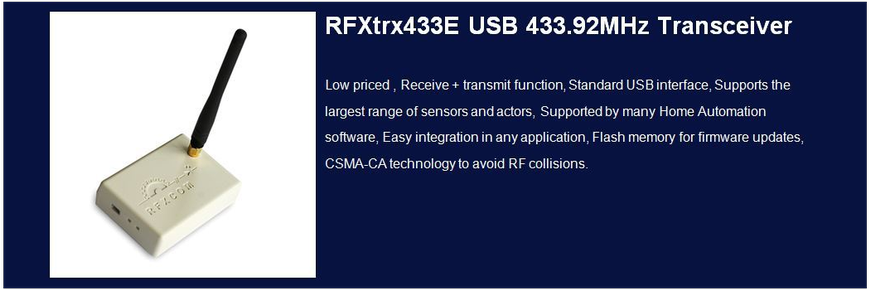
Our Domoticz setup has a RFXCom RFXTrx433E USB device that can be used to send and receive 433mhz codes like the HomeEasy and LightwaveRF ones. So it was an easy matter of creating a virtual switch in the Domoticz software which was sent out by the RFXCom unit and learnt by the curtain controller. We could then use Domoticz to control the curtains.
As an aside the RFXCom unit is probably the most expensive part of our setup. They retail for 109.75 € but we have seen them as low as £70 on Ebay.
When we first set up Domoticz this was the only alternative for such control but there is now another device: the RFLink Gateway which can be bought in kit form from http://www.nodo-shop.nl/en/rflink-gateway/127-rflink-arduino-antenna.html at 36,95 € - if you don't fancy soldering they will solder it for you for 5 euros. The RFXcom is prbably slightly easier to set up but the RFLink does also work well for this scenario.
Once we had set up our virtual switch, we created a timer in Domoticz which would switch on at a random time within an hour after dawn to open the curtains and another to turn on within half an hour of dusk to draw the curtains. One issue here was we couldn't tell if someone had manually opened the curtains. We came up with a simple if perhaps inelegant solution to this. We attached a magnet to the cord so that it rested on top of a reed switch placed on top of the motor unit when the curtains were closed. This reed switch was connected to a 433Mhz transmitter and sent an 'on' signal when the magnet made contact and an 'off' when it lost contact. This way we could tell if the curtains were already closed or open. We used a cheap read switch and a Nexa RF transmitter switch but you could use any of the magnetic door and windows sensors avaialble for HomeEasy or LightWaveRF or alternatively ZWave. We used only one reed switch whihc allowed us to tell if the curtains were fully closed or at lleast partially open. If you wanted to tell if the curtains were opened fully you could add another reed switch and magnet on the cord on the other side of the motor aligned to make contact when fully open.
We used our timer switch to trigger an event in Domoticz. Domoticz has a very powerful scripting engine that uses the LUA engine which is pretty easy to pick up if you have done any form of coding but fortunately, if you haven't, there is also a nice visual tool based on the Blockly interface. This allows you to drag and drop switches, conditions and actions to form an event.
 This is our event script for opening the curtains which fires when the timer triggers. It checks that the curtains are closed and that we are not in dusk (this is to avoid an issue with the system being restarted after dusk where the timer immediately fires). If the conditions are met it sets the timer off so it doesn't re-fire, uses a Text-to-speech extension for Domoticz to warn that the curtains are opening then sets the actual switch to power the curtains on for a minute which is long enough to ensure they reach the limit switch.
Now we did hit a couple of snags. Firstly we discovered early on there is a lot of friction on these type of curtain pole/ring arrangements but the very low-tech approach of polisihng the curtain pole with furniture polish actually solved this. Something which needs doing about once a month. Our second issue is that the remote box does not seem always to be reliable sometimes only turning on for a few seconds when it receives the signal. Thinking about this, a simple approach might be to use a HomeEasy remote socket to switch the power supply to the curtain unit on and off directly and take the remote out of circuit. This would mean you couldn't use the supplied remote though. For now we have got round this by using a slighlyt more complex LUA script that checks the curtians have actually opened/closed and if not tries again.
So far it has been working remarkably well for a couple of months. The only issue with the curtain opener is it is a little noisy but a drop of oil can help with that. We feel thsi was £35 well spent.
One of the very cool things that happened during this project is that we were prototyping the pulley arrangement and needed a specific two wheel pully we didn't have in our kit box. A few days earlier we had taken delievery of a 3D printer from XYZPrinting and someone suggested looking online to see if there was a 3d printing file available for such a pulley. 3 hours later we had one printed.

Now while we didn't end up using this in the final project this felt very much like the future. Which brings us onto our next review the fabulous DaVinci Jr.
XYZPrinting Da Vinci Jr 3D Printer
TrulyFascinating Award Winner

It is not often a product comes along that defines a whole new audience for its type but the DaVinci JR did that. When it was released last year it was the first truly consumer targetted 3d printer. Yes there had been other attempts to get in that market before but they had come from 3D printer manufacturers that had a Maker community point of view. A lot of knowledge was assumed and very little support given. Now XYZ entered the market from a conventional consumer ink-jet printing background. You may not have heard the name before but you have probably used one of the products their parent company manufactures for some of the major printing brands.
They applied some of those principals of conventional printers to create a product at an unheard of price point of sub £300. Now one of the things they did was to tie users in to using their own brand 3D printing filament which got some of the maker community up in arms who were used to using any old filament. Now there are some advantages to XYZprintings approach. The fact that the filament is supplied with an RFID chip with information about the type of material used makes set up a doddle and puts less risk of damaging the extruder head with incorrect settings. Something that inexperienced users have been known to get very wrong with other brand devices. When you consider that some other brand extruder heads cost more than the whole Da Vinci Jr you could buy a lot of filament for that money.
We found that the price premium for the Da Vinci Jr filament was not excessive and that you could get some very good deals by shopping around. With the target audience we think this is a reasonable approach. To give them their due XYZPrinting are about to launch a Maker community targetted printer that will not have this restriction but that is a different market.
Unlike some 3D printers we have tried the Da Vinci Jr was really easy to setup. Although the manual seemed a little intimidating it was purely a matter of connecting a tube from the extruder head out the top of the unit and back in to the filament feed from the reel and then putting the suppied tape on the printing plate. This latter is needed to allow for a good contact with the extruded filament so that the initial layer stays in place.
The supplied software works very well allowing you download 3D printing files from the web and send them to the printer to process. Complex models can take some time to print but are very accurate and the lack of any need to calibrate before getting started is a joy. We did have a couple of failed prints - these were normally where we were trying to print shapes that jutted out from the base or where the base was narrower than the rest of the print. There are options to work round this by printing a raft as a wide base and using thin supports to as they say support the model. The software can apply this automatically. Using these options solved all our failures - although we did have to use a sharp knife to cut away the supports.
As with all 3D printers some maintenance is required including cleaning the extruder head from time to time. These were well explained in the manual and unusually all the tools needed were supplied.
The question might be asked why you would want a 3D printer? Well if you are creative, or have creative kids, there are loads of 3D modelling packages out there, indeed XYZ themselves are just launching one, with which you could use the printer to turn your designs into real objects. I personally found a really good use for it in reproducing the broken clips for my footplate in my kitchen whch were no longer made. We also used the printer to make a charging stands for the Pebble Watch reviewed this issue. The file for this along with thousand of other objects was avaialble online. The possiblities are endless.
You can probably tell we really like this printer it truly opens up the market to the masses and is a joy to use. We can't wait to see what XYZPrinting does next.
Finallly all work and no play makes Garry a dull boy but fortunateley Acer sent us two bits of computer equipment which really helped. (Note we do not go into great technical detail in our computer reviews but look at them from a consumer point of view)
Firstly the Aspire V 15 V3-574 series laptop

This is an Intel Core I5 powered 15 inch full HD behometh with two graphic chips - a motherboard based Intel HDgraphic chip for longer use on battery and a discrete Nvidia 940m for high intensity video use, such as gaming and video editing at the cost of power.
We found this worked really well for gaming from steam with our current favourite Star Conflict from Steam running in a coonstant 60FPS in Full HD.
Video editing was a little more challneging the suppliedcut-down veriosn of CyberLinks's PowerDirector intially exhibited soem strange behaviour displaying only a blue screen on editing but being able to display the clips in preview. After some reasearch we found an update to both the program and the NVidia driver solved the issue.
We did take a while to get use to the keyboard and touchpad arrangement. This is a full size keyboard, albeit with chicklet style keys, and has a numeric keypad (useful for some PC games) but the touchpad is offset to center underneath the qwerty part of the keyboard. We found this offset to theleft disconcerting and often found ourselves right clicking rather than left clicking. Having said that, a colleague who usually hates laptop keyboards thought it was the best desktop replcement he had used.
As this laptop can now be found for sub £350 online it is a real competitor for some desktops.
But finally if you want a real desktop
Acer Predator G6

We loved this thing. Predator is Acer's hardcore gaming brand and it shows. This agressively styled unit houses a 6th Generation Intel Core i7-6700K processor and a Nvidia GTX-970 graphics card . Overclocking is made simple with a huge turbo button that users can push for instant overclocking. The IceTunnel cooling system means this can be done with minimal fan noise-although we did find a bit of a whine in intense situations but the rather lovely audio drowned this out.
This unit comfortably coped with any game we threw at with rock steady 60FPS ratings. it with the only slightly disapointing thing being it failed the Steam VR check but a driver update may resolve this.
We loved the case with its milaatry styling and plethora of hidden ports - there are enough USB and audio ports to satisfy most. Our only light issue is that this lovely styling has led to a rather compact interior with not much room for future upgrade.
*PLEASE NOTE* the model we reviewed is not available to purchase in the UK. This review unit runs with an Intel Core i7 processor, 64GB DDR4 Memory and a solid state drive. The UK sold models have 12GB DDR4 Memory.
We've seen this listed online at £1500 which may seem a lot of money but gamers have been known to spend a lot more and this is a pretty good price for the spec.