Richard's Realm -Summer 17 - Fascinating Tech Magazine Archivee
Main menu:
Richard's Realm -Summer 17
Archived Issues > Summer 2017 Issue
Richard's Realm
Want to go a little more in depth Richard is your man
In this issue: Thorpe Park with Acer, VR with Tim Peake, TP Link Smart Bulbs, Vegas Video Editing(In Depth)
You’re wearing it wrong - a day at Thorpe Park with Acer

There is a condition afflicting those who like their Reality to be Virtual, Mixed or even Augmented. Nobody really likes to talk about, but it is time to bring it out of the shadows and into the light. This condition is ‘cable fear’.
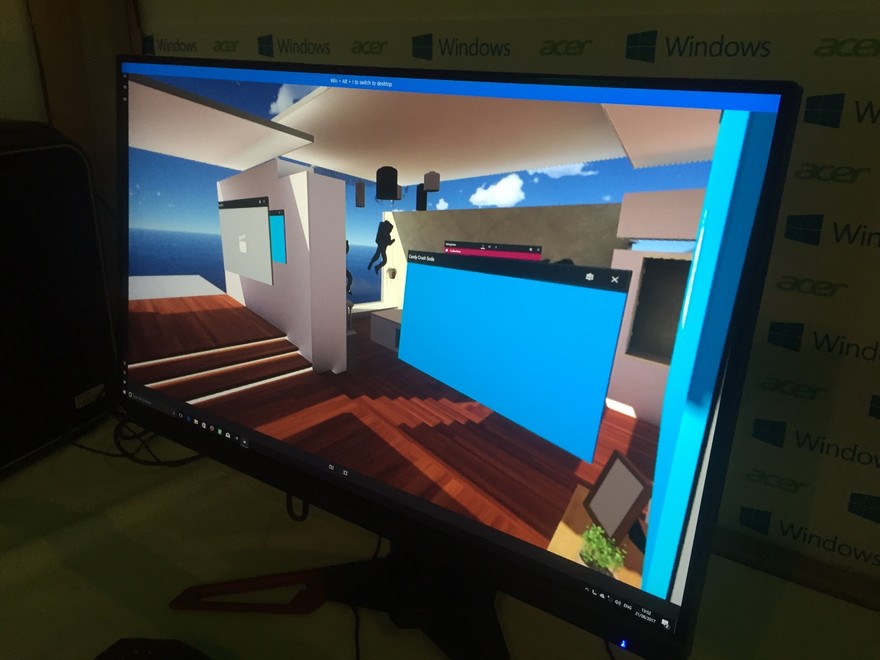
Acer had invited us to Thorpe Park (a leading UK theme park) to show off their upcoming Mixed Reality headset, due for launch towards the end of the year at a very keen price point. Garry and I both spent some time in Microsoft’s virtual house-on-a-cliff (the demonstration Acer were running) as well as revisiting some old friends in the form of the excellent Predator gaming laptops and the refreshed Spin and Switch line-ups.
The star of the show was undoubtedly the headset. Available from August (for developers) and with an unknown UK price (US developers will pay $299), this is an impressive bit of kit. Fitting comfortably even on my giant head, the two LCD screens within are bright and have an acceptable 1440x1440 resolution (giving a combined 2880x1440) running at 90Hz. Not retina level, but certainly in the ‘good enough’ category. The visor can flip up to allow for the occasional glance at real life and the 95 degrees horizontal field of view is surprisingly immersive. You’ll need to bring your own headphones for audio, which plug directly into the headset.
And the ‘cable fear’? Like the majority of other headsets out there, a single cable tethers you to a PC (currently quite high-end – Microsoft recommend a Core i7 with 16gb RAM and a GTX 980 graphics card or equivalent). Acer’s demo had us standing while wearing the headset and after a few steps, Garry looked more like a morris dancer struggling with a disastrous maypole incident than the IT professional that he is, as the cable became tangled around him. There were a few heart-stopping moments for the Acer tech as it looked like we might actually pull the Predator PC powering the headset off the table.
Considering this product is not yet ready for commercial release, it is most impressive. The demonstration world was immersive and mixing familiar Windows GUI elements (such as a calendar or email app) with a virtual home was neat and effective. Being able to pin application windows to walls and conjure sculptures out of the air seemed the most natural thing in the world. Navigating using an Xbox controller was somewhat less natural, but since this is for developers it can be forgiven. A purpose-built wand is planned for the retail channel.
While this was only a preview, I am very excited about this development – having been somewhat neutral about Mixed Reality in the past, a headset at this price-point with these specifications has potential to be a game changer. As long as you have a PC capable of supporting it…
As for Thorpe Park? Acer had the misfortune of selecting the hottest UK day of the year so far, with the star of the show (the Derren Brown VR Ghost Train) failing. The suggestion that Acer might switch out the headsets was met with horror from the PR people: “imagine if ours had failed too…”
The heat of the day did, however, provide an effective demonstration. While the assembled journalists scurried from Acer’s tent to find cooler shade and the park’s rides exceeded operating temperatures and failed, the other Acer gear on demonstration, from the power-hungry Predators to the svelte and silent Swifts and Switches ran without issue and without the vacuum-cleaner sound my Dell XPS makes as soon as the ambient temperature rises above “winter”. An unplanned and effective show of some impressive engineering.
As soon as we have review units, we will take an in-depth look at the headset and the refreshed Switch range, which is even more of a Surface competitor than before.
Next a bit more Virtual Reality (VR)
 Science Museum Tim Peake VR Experience
During the first half of 2016, Tim Peake, the second British person in space, orbited the earth aboard the International Space Station. While experiments such as the Astro Pi inspired students to write code to be run in space, other Brits of a certain vintage could not help but cry “come ON Tim”, Wimbledon-style, at the sky as the white dot of the space station passed overhead. But while Henman had his Hill, Peake had Principia.
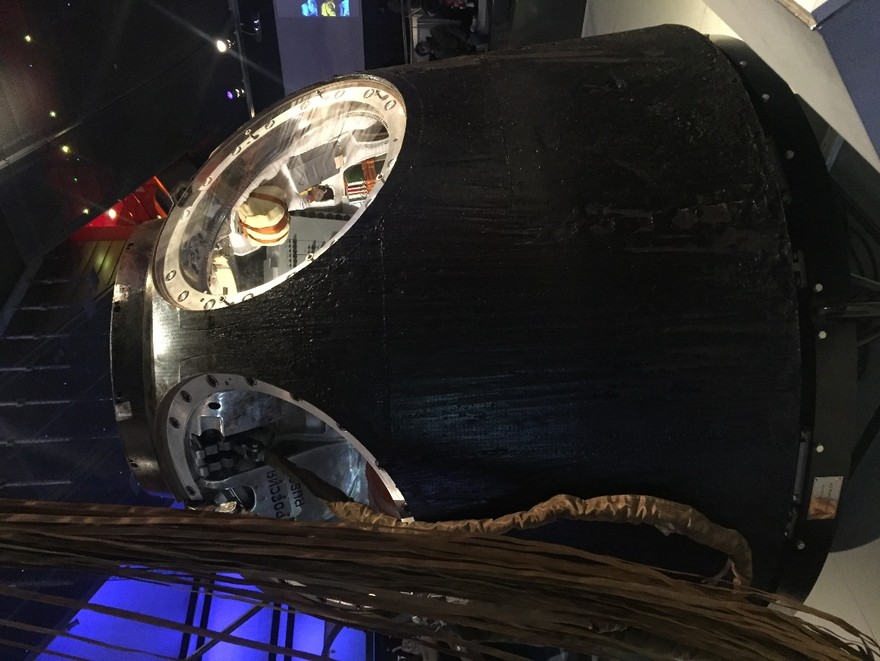
Shortly after its landing on the Kazakh steppe, the Soyuz capsule that returned Major Peake to earth was acquired by the Science Museum and subsequently put on display in January 2017. It is well worth a visit, just to compare it to the Apollo capsule in the neighbouring hall if nothing else and marvel at the origami required to fold three humans into it. At the end of March 2017, the Science Museum launched a new exhibit to give participants an idea of what the ride back from space might feel like. This is the Tim Peake VR Experience.
Suiting Up
My first experience of VR was over 25 years ago in the form of a version of Atari’s Hard Drivin’ game, hacked to support a headset so heavy that I spent much of the time staring at the virtual dashboard since I couldn’t actually lift my head to look around. Things have moved on quite a bit since then.
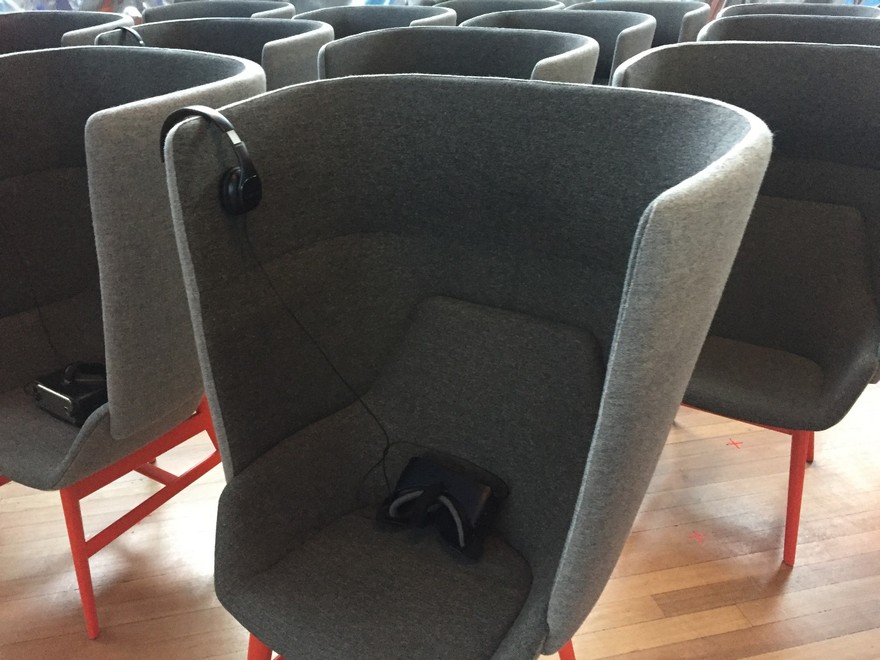
Resembling an airport departure lounge, the VR booths themselves are comfortable chairs, with a lightweight headset consisting of a Samsung Galaxy Gear VR and a pair of headphones. After some simple instructions and a dire warning about not pressing the wrong buttons on the headset (these are not custom items) it was time to don the Gear VR and enter the world of Tim Peake.
Getting the headset on is a simple matter of adjusting some velcro straps and fiddling with a focus knob until the image is stable. The Gear VR headset will also fit over most spectacles. A separate volume control is available, but best left on maximum.
The image itself is not the highest resolution display and, compared to a device such as the Avegant Glpyh, is not so easy on the eye. However, the field of view is good and the overall experience is immersive (if not interactive), particularly at the start of the experience.
Re-Entry and Landing
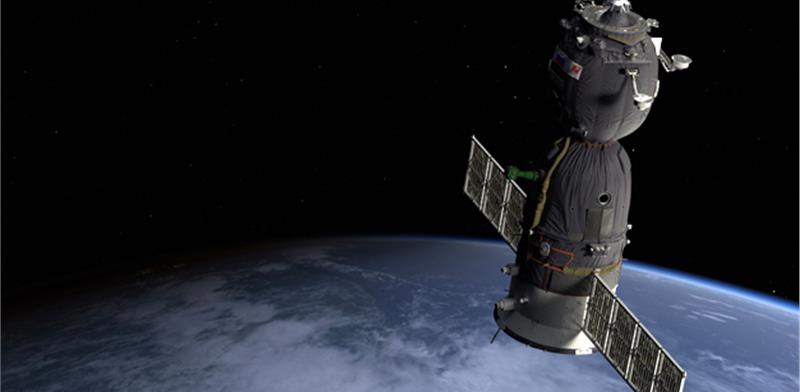
The opening fly-around of the International Space Station orbiting over the earth is breath-taking. Moving my head to take in the sights, from the sun glinting off the solar panels to the earth slowly moving beneath me, felt completely natural and did not result in the nausea I usually associate with VR experiences. To be honest, the first few minutes of the show are worth the entry fee alone and I could happily have spent the entire 15 minutes flying around the station.
After admiring the space station, you are then strapped into the Soyuz ready for a return to earth. To be honest, the portions inside the capsule are the weakest parts of the show – the grand vistas (such as an orbital sunrise) outside are far more impressive. The interior portions also highlight the main weakness of the experience – despite Tim Peake urgently warning of bangs and crashes as rockets fire and modules separate, you never feel like you aren’t sitting in a comfortable chair in South Kensington. A motion base would transform the experience.
Conclusion
At this point I have to confess some self-interest here – I am a huge enthusiast for all things space-related and so am somewhat predisposed to enjoy this experience. Obviously, it is possible to pick fault with the representation of the interior of the Soyuz or the exterior of the International Space Station, but to do so is to miss the point by a mile. Looking down and watching the earth rotate beneath your feet is an exhilarating experience and as close to orbital spaceflight as many of us will ever get.
The performance is an extension of Tim Peake’s mission to educate, and the participant will come away with both an appreciation of the sheer grandeur of the endeavour that is the International Space Station along with an understanding of what it actually takes to return from space. All in less than 15 minutes. I would therefore declare this portion of the mission a success - it is inspiring and I’d recommend it to anyone aged 5 to 95. Who knows, maybe the first person to set foot on Mars will watch this and follow their dream into astronautics.
While entry to the Science Museum in London is free (including looking at the Apollo and Soyuz capsules), participating in the Descent VR Experience costs £7. Tickets can be either collected on the day or booked in advance (a good idea in busy times) using the web site http://www.sciencemuseum.org.uk/
Next Richard's smart bulbs have finally arrived
TP-Link Smart Wi-Fi LED Bulb LB120
Arriving too late to make the cut for the last issue, does TP-Link’s foray into Smart Bulbs have a bright future, or are its prospects a little dim?
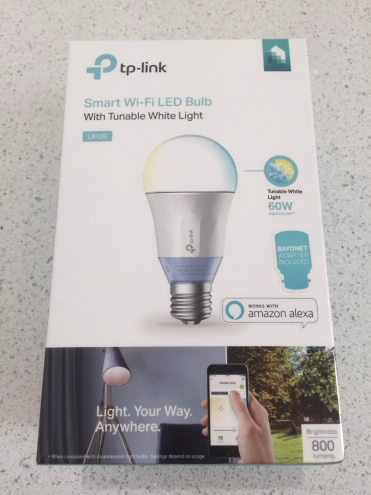
After a good experience with TP-Link’s HS110 Smart Plug, I was interested to see how the Smart Bulbs work in a house controlled by Alexa. The LB120 is a dimmable LED light bulb that can be tuned to colour temperature from 2700K to 6500K and up to 800 lumens (equivalent to a 60W incandescent bulb, according to TP-Link.) Energy savings of 80% are claimed by TP-Link despite the always-on nature of the device. It connects directly to a 2.4GHz Wi-Fi network without needing a separate hub and is controlled via the TP-Link Kasa smartphone app.
The Hardware
There is no getting around the fact that this bulb is larger than a normal bulb and weighs nearly 200g. This size is further exaggerated by the requirement of a bayonet adaptor to allow the E27 Edison Screw type connector to be used in most UK light fittings. This is not a bulb that is going to work well in a small table lamp or hanging from the ceiling in anything but a larger lampshade.
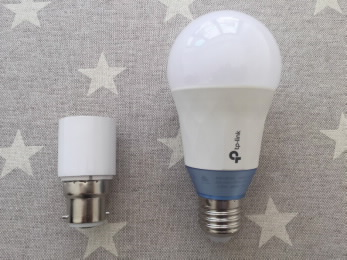
Once one has got over the size and weight of the thing, the construction itself feels robust with high quality materials. However, I’m less sure about the adaptor, which felt a little flimsy. However, with an estimate 25,000 hours of life in the bulb, it is unlikely to be moved much once fitted. Two slight concerns are that the bulb did become warm to the touch during use, so some care should be taken with ventilation, and also a slight hum or buzz can be heard when the bulb is lit, which some may find annoying.
Set up
The LB120 is simple to set up. Upon applying power, the bulb flashes to indicate that it is ready to be connected. As with the HS110 Smart Plug, a user needs to install the TP-Link Kasa app (Android and iPhone only) and connect to the network broadcast by the bulb. Kasa then takes the user through adding the bulb to the user’s home Wi-Fi network, naming the bulb and selecting a suitable picture for it.
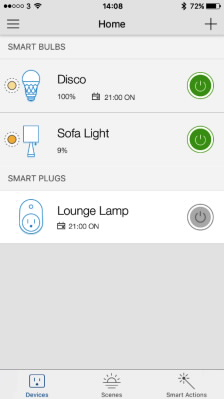
Once connected, it appears in the device list (see screenshot) and can be turned on and off. The whole process takes a matter of minutes and is impressively straightforward.
Controlling
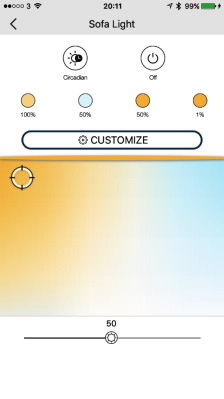
Selecting the device in Kasa gives access to the two main features of the LB120 – the brightness and light temperature and the circadian function.
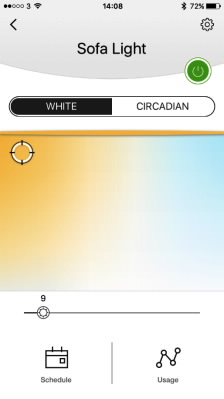
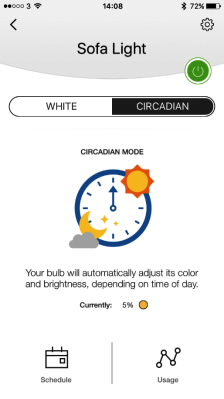
Adjusting the brightness and temperature is intuitive, with a simple swipe of the finger. However, the circadian function is particularly interesting since, once that mode is enabled, the bulb with automatically change temperature and brightness depending on the time of day rather than needing a manual schedule to be configured.
One other feature of note is that Kasa will continue to allow the bulb to turned on and off even if the internet is down, so long as the home Wi-Fi remains up.
Scheduling
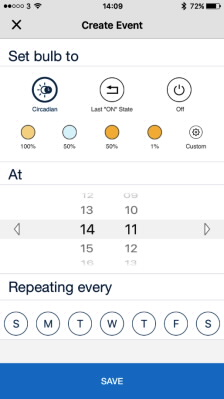
As with other devices controlled by Kasa, schedules for switching the bulb on and off can easily be configured. As well as a binary “turn it on or off”, the brightness and temperature can also be set from either a range of presets or by specifying a custom setting. The circadian function can also be switched on and off via the schedule. The configuration of a schedule is remarkably easy, and thought has been given into ensuring non-technical users will be able to configure and control the bulb’s behaviour.

Power
TP-Link make some bold claims about the power consumed by the LB120 and it is possible to monitor usage from within the Kasa app.
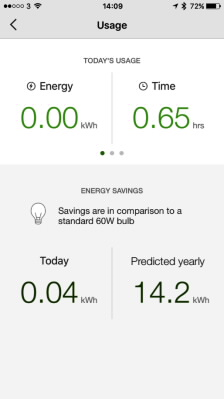
Usage over a period of time is available as well and shown as power consumption in kWh or the time the bulb is actually switched on. A neat additional feature is a prediction of what the annual power consumption is likely to be. Unfortunately, there remains no way of accessing this potentially useful data for further analysis so, as with much of Kasa, this feature is targeted mainly at more non-technical users.
Scenes
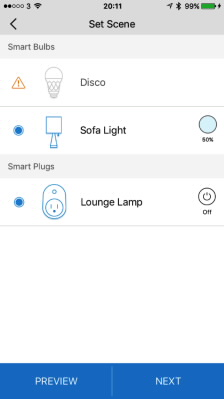
A final, useful function within the Kasa app is the ability to group a number of devices and actions together into ‘Scenes’, which can then be triggered by a single touch on the smartphone screen. Kasa provides a simple wizard interface to add devices to a scene, define what those devices should do and finally select a meaningful icon and name for the scene. For example, an ‘Evening’ scene might dim all the smart bulbs to 50%.
As with the scheduler, the full range of configuration options for the LB120 are available for setting as part of a scene.
Amazon Integration
TP-Link make much of their integration with the Alexa ecosystem, and one the TP-Link Smart Home skill has been enabled on a user’s Amazon Echo and discovery run, the LB120 is immediately available. It does suffer a little from the awkward and stilted syntax sometimes needed to control devices with Alexa, but once the basics are learnt the bulb can be turned on and off or brightened and dimmed using voice commands. It is not possible to set the colour temperature via Alexa, which is a shame and the ability to use Alexa to switch to circadian mode would also be useful. As such, the dream of not having to use an app to control a smart bulb has not yet been realised with this device.
It is also unfortunate that it is not possible to access the scenes configured in the Kasa application to perform a pre-configured set of actions (for example, turn on all side lights in the lounge to 50% brightness.) Instead, a user must use Amazon’s own, more basic, grouping functionality, which only allows grouped devices to be turned off and on. This limitation seems a little odd. Also, at the time of writing, the Kasa ecosystem is highly locked down – support from third party integration tools such as Stringify or IFTTT are promised, but are not here yet.
Conclusion
As a starting point for users wanting a smart bulb to play with, the LB120 is a good introduction. It does not require much in the way of technical skills to set up and works well. However, the size is a concern for me (particularly with the adaptor) and the lack of integration into any ecosystem other than Amazon’s will put off enthusiasts. I would not want to equip an entire house with these devices – a smart light switch might be a better long term bet.
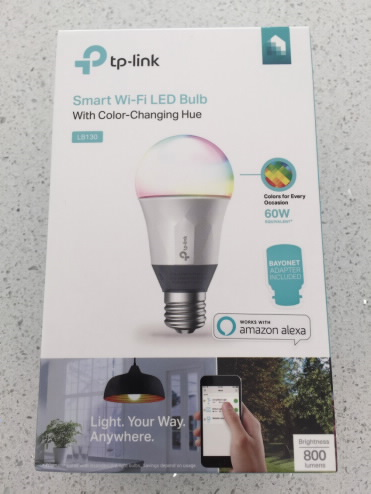
TP-Link Smart Wi-Fi LED Bulb with Colour Changing Hue LB130
“You wait months for a TP-Link Smart Bulb to arrive, and then two come at once” is a saying that no-one has said ever. However, just after the LB120 arrived, its more colourful sibling, the LB130, put in an appearance. But is TP-Link’s colour changing smart bulb the life and soul of the disco, or will it be found in the kitchen at parties?
As well as the new colour functionality, the LB130 bulb carries over all the features, and sadly all of the flaws, of the LB120 (reviewed above). There is a slightly larger range of whites available – now 2700K to 9000K. The lifetime remains unchanged at 25,000 hours, as do the claims of the bulb’s energy saving abilities.
The Hardware
If it were not for the change in colour of the adaptor, a user would be hard pressed to tell the difference between the LB130 and LB120, which means the issue of size remains along with a very slight increase in weight.
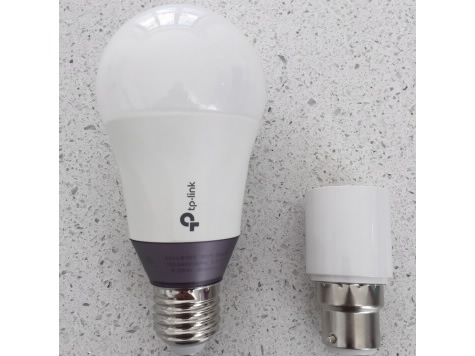
As with the LB120, the bulb is an E27 type with a bayonet adaptor provided to allow it to work in the majority of UK light fittings. And again, using the slightly flimsy adaptor raises the same issue of bulb height.
Setup and Control
The LB130 is controlled through the Kasa app and set-up is identical to the LB120. As such, this is a very simple smart bulb to get running, requiring very little technical ability other than knowing how to join a wireless network on a smartphone. Once connected, the smart bulb appears in the device list and can be switched on and off and added to scenes in the exact same way as the LB120.
While the LB130 offers the same white light options and circadian functions as the LB120, it does have an additional trick up its sleeve, configurable through an additional option in the Kasa application.
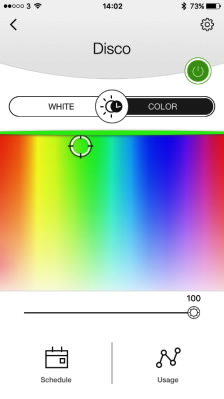
This is, of course, the ability to select from any of a theoretical 16 million or so RGB colours. TP-Link are to be commended for a well-designed interface that gives a logical progression from the LB120 options. However, with that ease of use there is also the frustration that comes with wishing for a bit more technical control too – the ability to actually enter RGB values as well as using a colour picker would be more appealing to enthusiasts.
The bulb is quick to respond to selections within the Kasa application, and the colours are deep. The LB130 is certainly one of the better colour bulbs I have come across, with rich bright colours that fill a room.
Aside from this additional colour selection, there is no difference in use between the LB120 and LB130, which makes for a pleasingly consistent user experience.
A glaring omission is the ability to animate colours (other than by setting up a huge number of schedule events to cycle through colours). This seems a strange function to be missing and hopefully will be added soon.
Amazon Integration
The same functions found on the LB120 with Alexa are present with the LB130: bulbs can be turned on and off and brightness set (but not white temperature). It is also possible to set the colour as well through Alexa. This currently feels a little like a bit of a gimmick with little more than novelty value. At present, the user is stuck with TP-Link’s preset colours. Don’t like what TP-Link think ‘Red’ should be? Tough – you can’t change it. Saying “Alexa, set the lounge light to orange” is neat for the first few times, but before long frustration will set in that it is not possible to use Alexa to access Kasa’s ‘Scenes’, where these settings are fully configurable.
As with the LB120, integration with third party tools remains “in the future.”
Conclusion
The LB130 is certainly superior to its sibling, the LB120, just for the greater range of white temperature if nothing else. The ability to control the colour of the bulb is a delightful bonus. It also remains very simple for a user to set up and get running without needing much in the way of technical knowledge. The size remains an issue and the lack of integration with third party tools such as IFTTT and Stringify reduces its appeal to enthusiasts (who would likely be better served by a Philips Hue device or smart light switch). However, as an easy introduction to what can be done with smart devices, it deserves consideration.
Vegas Movie Studio 14 Platinum
Introduction
Released in time to edit the 2017 crop of summer holiday videos, Vegas Movie Studio 14 Platinum offers a wide range of features but faces stiff competition from not only the likes of Adobe, but also from siblings within the Magix stable.
Originally a Sony product, Vegas Movie Studio was acquired by Magix and version 14 is the first full release from the new owners.
Not to be confused with the Pro editions of the software, there are three flavours of Movie Studio to choose from: Movie Studio, Movie Platinum and Movie Suite, with progressively more features in each (along with a naturally steeper price tag). In this review, I will be taking a look at the Platinum edition of the application, which currently retails for $79.99.
Requirements
The basic system requirements are quite low, with 2GB RAM and a 2GHz processor required along with 512MB of graphics memory (on an Intel, NVIDIA or AMD graphics card). 64 bit Windows 7 or above is required and a CD, DVD or Blu-Ray burner is needed for the creation of media.
These seem very low, and I doubt a user would be particularly productive at such a level. My test system was a Core i7 with 16GB RAM, which had no problem running the application.
Installation
The Magix influence can be felt as soon as installation kicks off, requiring the use of the familiar Magix key registration utility to unlock the software. Once installation is complete and the application loads, the first of the changes made by Magix can be seen.
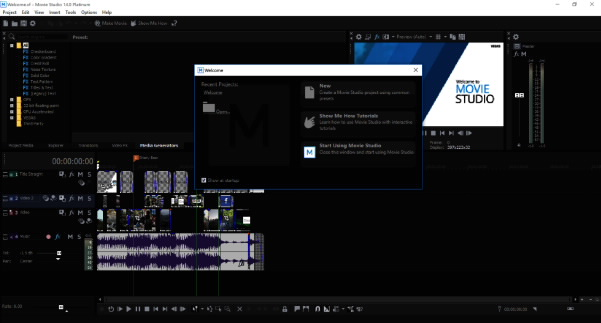
As is the fashion, the new interface is dark themed. While not to my taste, it certainly looks smart and, most importantly, is DPI aware. This means that switching between a high DPI laptop screen (such as my Dell XPS 13) to a large monitor is seamless and lacks the scaling problems seen on several other video editors (Magix Movie Edit Pro, I am looking at you). I was also pleased to see the use of standard common dialogs for functions such as Open or Save, which will flatten the learning curve somewhat.
Getting Started
Once a user has moved beyond the most basic video editing functions of their smartphone or the likes of the much-missed Windows Movie Maker, the jump to more advanced video production can be daunting, with impenetrable interfaces and complexities introduced seemingly for the sake of it. Vegas Movie Studio attempts to overcome this with an excellent online tutorial, which introduces the user to the editor tools and windows with clear graphical cues.
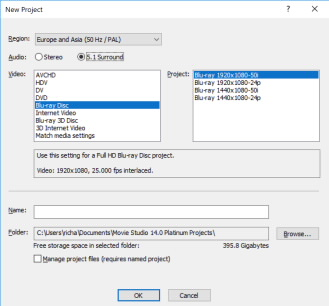
After an hour or so of tutorials (less, if you’re the kind of user like me that tends to ignore manuals until nobody is looking), it is simple to jump into a new project. Movie Studio 14 Platinum provides a number of presets with which to get started, all of which can be tinkered with later.
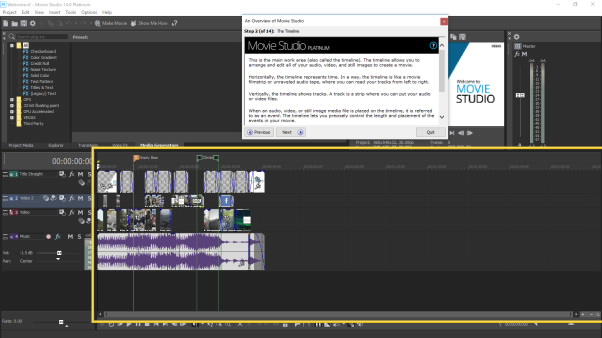
Timelines
In common with most video editors, Movie Studio 14 Platinum provides a timeline into which different video and audio tracks can be placed. Up to 200 tracks are supported in the Platinum and Suite products while the basic Movie Studio package will only allow up to 10. 10 tracks may be enough to start with, but most users will quickly find themselves needing more as additional audio and video timelines are added for effects such as credits scene transitions. Certainly, for the sake of an additional $30, it is worth getting the Platinum product rather than the basic package.
Creating additional tracks is a trivial matter, and it is equally simple to add media to a track, simply by dragging and dropping to the required position, either from Windows Explorer or through a browser built into Movie Studio 14 Platinum itself. The heritage of Movie Studio can show itself here – I attempted to add a .mov file taken with a 5-year-old digital camera and Movie Studio 14 Platinum insisted that QuickTime must be installed. Since Apple dropped support for QuickTime for Windows in 2016, I found myself having to use a 3rd party tool (in this case HandBrake) to convert the file to use a .m4v container, which is a bit disappointing and may confuse the consumers at which Movie Studio 14 Platinum is aimed.
Media may be trimmed during the import process or once in the timeline, with a range of editing tools to mark crop points. Movie Studio 14 Platinum will also update the video settings of the project to match the imported video or vice versa. Thankfully, a warning appears before this happens.
Finally, media may be imported directly from a DV or HDV source, with audio pulled in directly from a CD.
Transitions and Effects
While getting media into a track is simple, applying transitions and effects is slightly more complicated. And again, Movie Studio 14 Platinum does feel a little dated in this regard, with an explorer interface used to navigate to the required transition type. There is a search option, but I found it to be a little hit and miss in my testing.
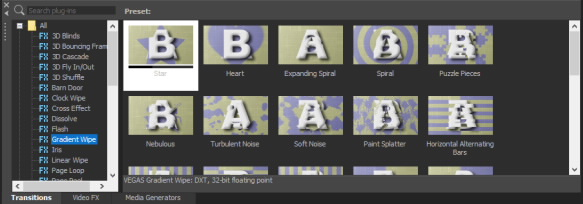
However, clunky navigation aside, there is a breath-taking variety of a transitions available within the application, from a wide variety of sources. The Platinum edition includes a number from NewBlue and OpenFX plug-ins can also be used.
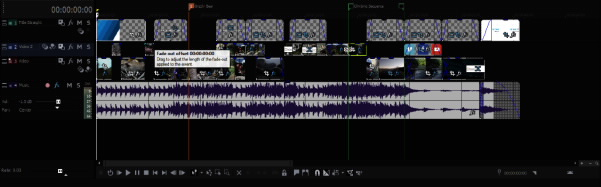
Wipes, 3D effects, dissolves and so on are all easily dragged and dropped onto the required track in the timeline at the end of an event (such as a video clip) or between two events and then configured. Each transition appears with a short animation to show what it does (when selected) which helps with understanding, although it would be useful to be able to view the transition preview using one’s own content rather than a pre-canned animation from A to B.
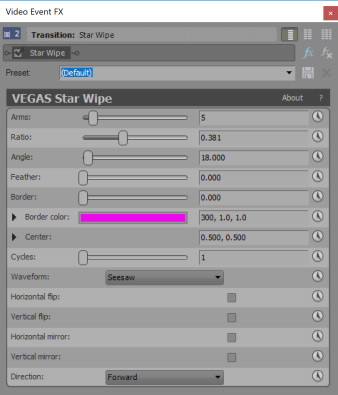
Configuring the transitions requires considerable effort on the part of the user – the possible options for each vary wildly and are not something that can be leapt into without first spending some time in the user guide and also doing some experimentation. Some of the transitions contain a bewildering number of settings and bely the professional origin of portions of the application. However, with some perseverance a user can expect some very impressive results, and user defined presets can be saved against a transition to speed the process of configuration in future projects.
Finally, care must also be taken not to throw too many transitions and fades at a project from an aesthetic standpoint (unless one is aiming for a cheesy 1980’s direct to video look and feel).
Panning and Tracking
Movie Studio 14 Platinum offers a comprehensive array of zoom and panning tools to allow effects such as Picture-in-Picture and video animation. Since a separate track is required for each video, a user would quickly hit the 20 track limit in the basic Movie Studio package if many of these functions are used.
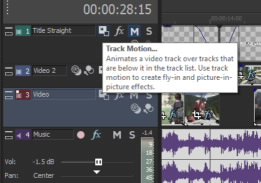
However, as with the transitions, this feature is well hidden in the interface and only a user determined to get through the tutorials will find it. Users willing to persevere will be rewarded with a variety of motion tools to apply to projects, including rotation and position. Keyframes may also be defined to allow for some basic animation of the video. It is also possible to apply drop shadow or glow effects.
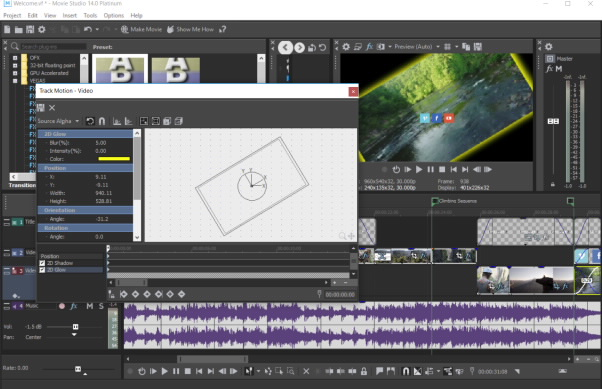
As motion edits are made, the video preview window is updated to give an idea of what the motion settings will look like. As with the transitions, there are many settings that can be adjusted, which may prove a barrier to new users. Some ready-to-use presets would perhaps have been useful.
VideoFX
As well as the tools to add transitions between video events, Movie Studio 14 Platinum provides a huge range of tools to correct and improve video clips themselves ranging from the trivial (exactly how many blurring tools does a person truly need?) to the essential. Any number of these effects can be applied to a single event, although the interface to do so can be a little frustrating to use and navigating through the effects on offer is not very intuitive (with some very useful options a little too well hidden).
Noise, Grain and Film effects can be added to give a video the effect of being broadcast on a poorly tuned analogue television, or shot on elderly film stock rather than digitally. The television effect can be further enhanced (if ‘enhanced’ is the correct word) by a TV Simulator, which will add scan lines to a video clip. A Bump Map may be applied to give texture and lighting to an otherwise flat image. A News Print effect gives the appearance of a newspaper photograph and two types of pixelation effects will provide a blocky appearance. Blurring effects (Linear, Gaussian, Radial and Quick) are present, along with Spherize, Deform and Swirl, which will distort the video image as the names suggest.
The wonderfully named ‘Convolution Kernel’ can be used to create an embossed version of the image, which might have been useful in a 1980’s episode of Doctor Who, but is of little use besides the eye-catching name.
More subtle effects are available, with standards such as White Balance, Brightness and Contrast as well as the ability to switch to black and white or sepia tones. A Threshold filter can also be used to reduce the colour count in order to make the creation of a colour keyed mask easier.
With all the video effects, animation can be used via keyframes to smoothly animate an effect from one setting to another (for example, to go from light to heavy pixilation).
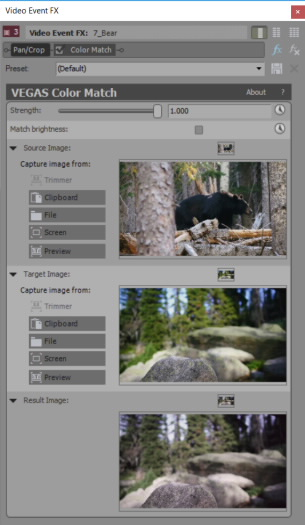
Correcting Colours
I was surprised to see a Colour Match tool in the VideoFX selection, since this is something I associate more with professional level software. Where there are multiple clips or the same scene or multicam sources, differences in colour saturation can be jarring. Unlike many of the near-professional level features in Movie Studio 14 Platinum that tend to be a little complicated in places, selecting a reference colour clip and pointing it at a target clip for matching is a straightforward process. Some additional configurability is possible with a ‘Strength’ slider to control how aggressively the colour matching function performs, but the defaults should be sufficient for most users. I found the results of this function excellent and was disappointed that it was hidden amongst less useful features.
Other colour configuration tools include a Broadcast Colours tool to adjust luminance and chrominance in order to avoid using colours potentially out of range for a television display. Chroma Blur will adjust the chromacity value of an image to smooth high contract images (and also help create smoother masks). Colour Correction provides a simple way to adjust the colour tone of a video clip without unduly affecting the balance.
HSL Adjust allows for the adjustment of the hue, saturation and luminance in a video, as the acronym suggests. Colour Balance is a simple RGB adjustment tool, while Channel Blend initially looks similar, but allows for special effects through copying the characteristics of one channel to another, working in either RGB and alpha or hue, saturation, luminance and alpha. Several Channel Blend presets are provided and I found it remarkably easy to create a deeply unpleasant mix of colours. Channel Blend is perhaps not a tool for the faint hearted.
The Black Restore effect is a nod to streaming services, allowing for compensation for noise in highly compressed formats. The threshold for Black Restore is the point at which any RGB colour (based on a weighted average) is set to black.
Stability
Not a reference to how often Movie Studio 14 Platinum crashed (although it did so more than once – a prudent user will need to save projects frequently), but instead tools to stabilise videos. I was pleased to find a ‘Stabilize’ function in the VideoFX section, since shaky video can be the bane of the amateur film-maker. The presets for Light, Medium and Heavy stabilisation work well, fixing much of my bad camera work. Additional settings allow for shutter correction, to fix skewing during horizontal motion or stretching during vertical motion. Again, these settings performed well.
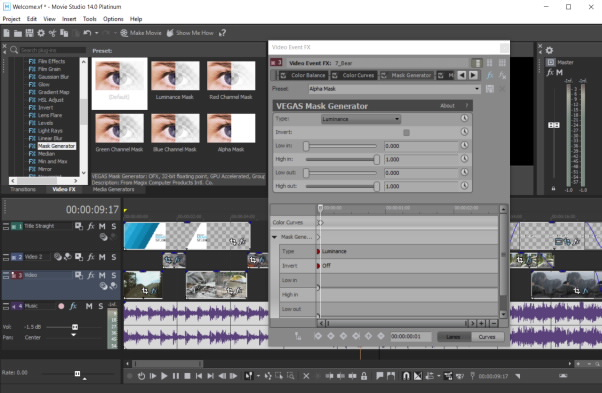
Compositing and Masks
Another well-hidden feature of Movie Studio 14 Platinum is the Compositing Mode, which allows the transparency of one video track to be set to allow a video track beneath to become visible. A mask may also be defined and one of luminance, RGB or alpha channel used to define the transparency. As with the transition effects, there is the potential for ferocious complexity as one works through the dialogs, but professional looking results can be achieved without necessarily having to shoot video in front of a green screen. However, if a green or blue-screened video is available or a mask has been created using the Threshold tool, then Chroma Keying can also be used to achieve a very satisfactory finish.
3D Editing
Movie Studio 14 Platinum has support for 3D video, although only stereoscopic. There is no support for 360-degree video or the emerging VR formats, which is a shame (particularly since this is particularly well supported by other products in the MAGIX stable). That aside, if 3D is a requirement, then Movie Studio 14 Platinum has the tools required to author in stereoscopic 3D, to the point where the preview window can show 3D content for wearers of anaglyphic 3D glasses. It is possible to view 3D output through supported 3D televisions or NVIDIA graphics cards supporting 3D Vision technology.
Separate tracks are required on the timeline for the left and right views and, unless the media has been synchronised at source or the cameras were genlocked together, it can be tricky to ensure the tracks are in alignment. Using the opacity functions to ensure the clips match is the recommended approach, but feels somewhat clunky in use, certainly when compared to MAGIX Movie Edit Pro
Titles Text and other Media
Adding text to video is a common function, and so I was surprised to find it tucked away on the Media Generators tab, beneath a function to add a test pattern to a video. I understand alphabetical sorting of functions, but I would expect a feature such as text to be promoted to a position on the toolbar!
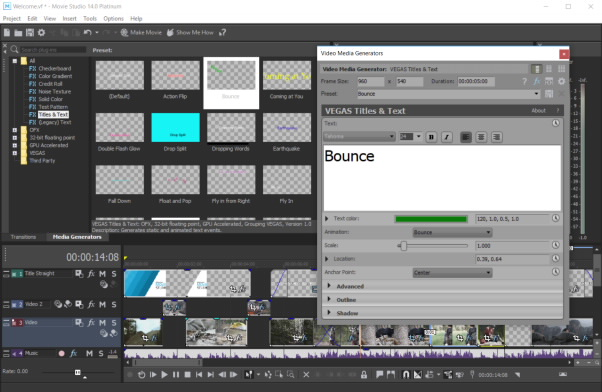
As with transitions and other effects, a preview of the text animation is shown in the list, giving an idea of what to expect. This is useful, because the text itself does not immediately appear in the preview window. Instead, the user must manually select the location and enter the text into the properties window. This feels pretty unintuitive and a little old-fashioned in use. However, there is huge flexibility in what can be done over and above the presets – any system font may be used at any size, and the colour and outline can be configured. Commonly used configurations can also be saved as custom presets, which will save time for users prepared to learn all the options.
Multicamera Editing
New to Movie Studio Platinum is support for Multicamera video, where instead of a single video clip being used, multiple ‘takes’ are supported at once, from which the user can select. Video for a single scene can be captured from up to 4 cameras and then edited in the timeline. This feature has fantastic potential for wannabe film makers, but there are some significant limitations.
The major issue with the multicamera implementation is synchronisation. Much like editing stereoscopic 3D files, the method used to synchronise the ‘takes’ is more than a little clunky, requiring the user to either work from the audio waveform to identify a clapperboard-type event or manually eyeball the image to ensure the video from the different camera sources is synchronised. Neither approach is ideal, and it is a good idea to ensure all cameras are of the same model with the same settings to avoid colour matching pain.
The other limitation is one of previewing the selection of video takes. While selecting a camera source for a given scene is simple, actually seeing the results of the selection in a preview video is only possible through an external monitor or by deactivating the multicamera editing mode, which is inconvenient.
Those annoyances aside, it is nice to see this type of functionality appearing in a product aimed at consumers, just the implementation leaves a little to be desired at the moment.
Audio
Movie Studio 14 Platinum supports basic stereo and 5.1 surround sound, although previewing a 5.1 surround sound project will require a sound card capable of supporting it and some powered speakers to actually listen to it. Once configured, setting an audio track for the left or right channel (for stereo) or to a 5.1 channel is straightforward. However, configuring the panning of audio for a surround sound project is little trickier than a simple left or right pan for a stereo audio track.
Again, Movie Studio 14 Platinum provides the tools to achieve a professional effect, but it takes effort to find and understand the more complicated settings.
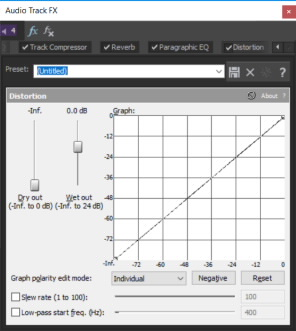
Effects may also be applied to audio tracks, and a limited array is provided within the package (including a number of plug-ins from the original Sony XFX-3 pack) giving options for distortion, reverb and equalisation amongst others. Of all the components in Movie Studio 14 Platinum, the audio effects are perhaps the least well documented and so are the most impenetrable. It is a shame there is little assistance provided to a novice user who perhaps just wants to reduce echo or background noise but might struggle with the breadth of options available for each effect.
With audio, it is also worth noting that a simple master bus control is provided to control audio output levels over the entire project for users that do not wish to go into too much depth.
Music Maker
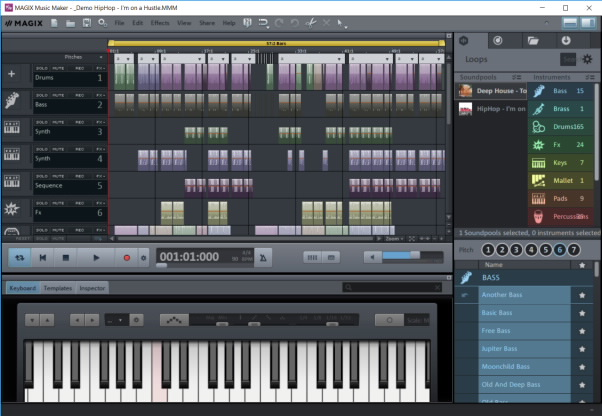
Bundled with Movie Studio 14 Platinum is the MAGIX Music Maker package, to create a royalty-free soundtrack for the project. I took a look at MAGIX Music Maker in the previous issue, and little has changed – it represents a simple way of creating some music, although the difference in interface (and poor support for high DPI displays) may be jarring for some.
I was, however, very disappointed to see the set-up program for Music Maker attempt to install a Windows optimiser called SimpliClean as a default. Unchecking the box prevented the install, but it is really not acceptable that a retail product should attempt to force an unrelated application onto a user’s system in this way.
Rendering Video
Once a project is completed, Movie Studio 14 Platinum offers a number of options to render the finished product. WMV, MOV (where QuickTime is installed), MPEG-2, MP4 and AVCHD formats are supported. The resolution and frame rate of the finished video file is defined as part of the project properties, and up to full 4K is supported at 60fps. The pixel aspect ratio may be adjusted to handle differences between widescreen and square screens, although I recommend sticking with the presets, which handle most eventualities. Audio may be 16 bit stereo or surround up to 48,000 Hz. Again, using the defaults will suit most users.
It is also possible to upload directly to Facebook, YouTube or Vimeo, although I suspect most users would want to check the finished product before doing so since while the preview window is helpful, it can be a little rough compared to a full render.
Rendering can also be done directly to Blu-ray or DVD (provided compatible hardware is available) although this will create a simple video disk. To create an authored disc with features such as menus requires an authoring package, such as DVD Architect, which is included in the Movie Studio 14 Platinum package (see below).
Actually, rendering the finished file can take a while, depending on hardware. Movie Studio 14 Platinum provides an estimate, but in my testing, I found it wildly inaccurate, with a HD render estimated at 35 minutes coming in at just under 4. To be fair, I’m much happier with the estimate being pessimistic rather than the ‘progress bar of lies’ that is so often the case.
DVD Architect
Bundled in the package is the DVD Architect application (acquired by MAGIX from Sony.) As with the Music Maker tool, this is an entirely separate application launched from within Movie Studio. It may also be launched as stand-alone program. As a value proposition, this is excellent to see, and provides the tools necessary to author simple DVD’s or Blu-ray discs with menu structures and chapter headings.
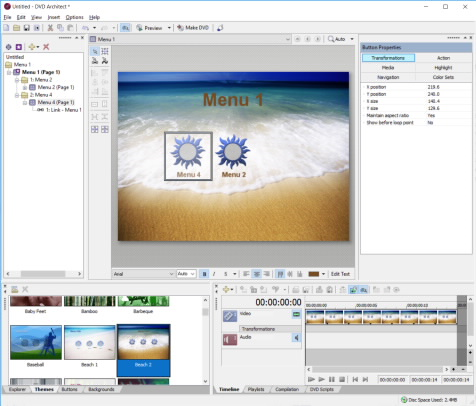
However, this application has quite a steep learning curve and, while the documentation is detailed and features tutorials in a similar vein to those found in Movie Studio 14 Platinum, the user interface and workflows are significantly different, with DVD Architect very much showing its age compared to the polish applied to Movie Studio.
I had some difficulty with making the integration between Movie Studio 14 Platinum and DVD Architect work as expected and found the most reliable approach was to first render the video in Movie Studio and simply use it as a resource in DVD Architect. Be aware, however, that DVD Architect does require some time to be invested in the tutorials before creating menus and layouts to avoid time consuming errors (although these are mitigated somewhat by an excellent preview function).
It is also unfortunate that while Movie Studio 14 Platinum supports 4K video, DVD Architect does not.
Conclusion
There is much to like in Movie Studio 14 Platinum, and it may seem that I have given it a bit of a hard time. The interface has a polished, modern feel to it and supports high DPI displays. It has some editing features that wouldn’t be out of place in a professional level application and some excellent documentation and tutorials to help get the best out of the software.
Add in the bundled Music Maker and DVD Architect software, and the value for money of this package cannot be disputed.
However, the professional features could also confuse the consumers at whom this product is targeted – there is little to assist a user trying to get deeper into the effects and transitions – and the user interface itself sometimes seems to delight in hiding away some of the more useful features. The lack of 360-degree video support is unfortunate and will hopefully be rectified in a future release, and the multicamera support feels more like a novelty rather than a fully-fledged feature at this stage. I do also have some concerns about general stability – the application crashed a number of times in use – and being forced to install software that Apple discontinued in 2016 feels wrong somehow and smacks a little of a lack of development in some areas in this release.
Ultimately, the entire suite represents great value for money despite my reservations, coming in below competing products such as CyberLink PowerDirector and Adobe Premiere Elements while perhaps lacking their polish.
Garry follows up on last issues Energenie and Wolet reviews. He also looks at some fantastic Edifier Speakers | Ruth is back this issue and looks at the Huawei Watch 2, Acer Chromebook and a great STM Bag | |||
A Video Editing review special, a Virtual space visit and a special day out with Acer | Peter harnesses the Sun's energy | Back to the cover |