Time and Motion
Summary
Honestech Stopmotion Studio 4 is a very clever piece of software that will have school children making animations and cartoons within a few minutes of launching.
The shallow learning curve and easy to follow instructions will hook the user quickly, and with the ability to preview their work at any point (without leaving the main interface), it will keep them glued to their seats.
The simple interface invites a quick start up and "hands on" approach while more advanced options such as Rotoscoping and ChromaKey will satisfy the more adventurous user.
Without too much effort we could be seeing budding Ray Harryhausens or Suzie Templetons in the making.
Product Shot
Product Details
Product \ Packages
Package Contents
- CD
- Product Key
- Quick Start Guide
Specifications \ websites
- Version under review 4.0.13.1(4.0.17 available)
- Main site http://www.honestech.com/main/index.asp
- Updates http://www.honestech.com/main/SoftwareUpdates.asp
Input resolutions (device dependant)
- From 160 x 90
- To 1280 x 1024
- Frames per second User selectable 1, 2, 3, 4, 5, 10, 15, 20, 25, 30
Output formats
- WMV 320 x 240 @ 25 fps > 1920 x 1080 @ 30 fps
- MPEG1 Best, Good, Normal, VCD_NTSC \ _PAL
- MPEG2 Best, Good, Normal, SVCD_NTSC \ _PAL, DVD_NTSC \ _PAL
- HD MPEG HD_NTSC \ _PAL (1280 x 720 or 1920 x 1080)
- iPad \ iPhone \ iPod Various \ Numerous formats
- PSP Various \ Numerous formats
- YouTube Upload to your account (password required)
- Facebook Upload to your account (password required)
Items used in the review
The following items were used but do not form part of the review
- WebCam Logitech QuickCam Pro 9000
- Firmware Version 2.96.6009
- Driver Version 13.51.823.0
In General
Installation
Installation was quite straight forward with a minor hiccup when a newer version of Quicktime was found already installed on my PC.
The system generated a warning message that installation could not proceed but after OK'ing the message box installation did in fact continue.
Adobe acrobat 9.2 was installed as a pre-requisite and the whole install completed in only a couple of minutes.
The system uses a horrible beige background colour for its message and dialogue - Not an issue in itself but it didn't look pretty.
Post install the system requested a licence key and used the web to authenticate it (mandatory), then invites the user to register the software in order to receive
updates (optional).
Subsequent launches of the application continued to pop-up the registration dialogue box but this can be "delayed" \ disabled for a user entered number of days.
Launch
On launching, and after skipping the registration dialogue if appropriate, the system displays its main user interface.
It has 6 key areas with menus and other dialogues popping up modally when required.
A menu bar at the top allows the user to access basic options, the contextual ("point at") help menu and general help. The centre-left area is taken up by the Capture \ Preview window while the right hand is taken up by a settings palette for video, chromakey, rotoscoping and audio options. A timeline control bar sits below this with a tool box and the time line below that.
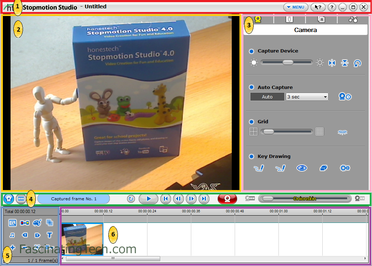 1 Title and Menu bar
2 Preview Area
3 Key palette and settings
4 Timeline controller
5 Tools
6 Timeline
Basic use
The key button is the big red Record button in the middle of the timeline control bar.
A click on this button takes a snapshot of what the camera sees and adds it to the timeline. Move the objects in the scene, and take another shot, then another, then another and soon you have your first animation.

All the other functions and menu options then add to this basic process and make some tasks even easier.
You can instruct the software to take snapshots every 1, 3, 5 seconds etc... allowing you to move scenery and having the snapshots be taken automatically.
The same options allow for snapshots every 10 or 30 minutes or even hourly or every 10 hours allowing for a basic form of time lapse photography to take place (plants growing or following the sun for example).
You can display a grid on the preview area to assist framing and composition (not displayed on the resultant animation), and also draw lines and paths on the preview to assist in the movement of scenery - again, this is not stored on the preview itself or the final animation.
The onionskin slider is a useful control as it allows the last image to be displayed on the preview as the next image is composed allowing you to see where the object should move next in order to get a smooth animation.
The preview can be set through varying opaqueness levels to suit the users preference, from almost transparent to almost solid.
It can also be disabled completely.

Individual (or groups of) frames can be dragged to different positions within the timeline as required, or deleted by pressing the delete key.
If frames are to be inserted into the middle of the timeline, the user can scroll to the correct position and press the record button as normal. All very simple and most of all intuitive.
Playback of the work so far can be initiated at any time by clicking on the Play button to the left of the record button.
The animation can be looped, or halted after 1 play, or when the user clicks on Stop.
This ability to immediately play what's recorded is key for the target audience - They do not have to wait for rendering or saving before they can show off their work.
The project \ work in progress can be saved at any time and the system allows for a small amount of meta-data to be stored for any project (when a project is started they are prompted for Title, Author, Comments - This is the metadata)
Advanced controls
Some advanced controls are available for those wishing to delve a little deeper.
Chroma Key
This tab allows you to select a colour (range of hues) on the preview and replace them with a background image selected from any images on the PC.
This is how green-screen \ blue-screen works in the movies or on the weather channel.
Typically a piece of cloth or paper of deep blue or green is placed in the cameras view (or any other colour that is not present in the scene) and the appropriate background image (a castle, the sea, hot lava) is then displayed in its place.
In the following screenshot, a green piece of material was placed in the camera view and a "green" selection from the colour panel was selected.
The green material was then replaced with the background image of the dog.
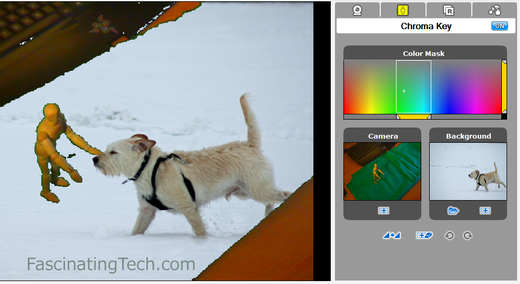
The main image is what will be recorded, the small image to its right shows what the camera is actually seeing (the strop of green cloth) and the last image on the right is the image being used to replace the green cloth.
String removal
For the times when the strings or blue-tac used to hold the props in place become visible, the software allows the users to erase them by over-painting the appropriate areas of the frames with the corresponding areas from a reference frame.
It's not perfect and if the video camera has auto colour or white balance, the editing may be more visible than the artefacts it's trying to replace - Used with caution its a useful tool and, like most elements of the software, changes can be undone (ctrl+z).
Audio
The software allows background music to be played along with the animation, or for a soundtrack to be added afterwards.
In the example video accompanying this review, the imagery was shot first, then as the video played back, the audio elements were then added.
It took a few goes but in the end the audio was added in real time as the video was played back.
Titles
Static titles can be added at the start and \ or the end of the animation for a suer determined period of time (measured in frames).
It's pretty basic but it suits its purpose and audience, allowing the creators to add their names to the animation (ala TV credit style)
Text
Similar to titling, text can be added at user selected frame and last for a variable number of frames.
It's static text again (no fades or transitions), but it adds a bit more depth
Other items
Capture quality
Videos can be captured in a variety of resolutions from 160 x 90 to 1280 x 1024, device dependant.
At any resolution the playback quality will only be as good as the device that captured it - If the webcam is low quality, then the captured video, thus playback, will be no better.
Output options
As shown in the specifications section the software can output video in a number of formats, even uploading to YouTube or Facebook if the appropriate account details are entered.
The variety is useful as it should allow for a simple upload to the schools website or YouTube channel for the creators to see and share.
Issues
The software did lock on two occasions, both times after a period of inactivity and when having the webcam controller options displayed.
This may have confused the software as it became inaccessible to the point of locking the PC.
A hard reboot was necessary as an operating system reset just hung, and logging off then on again didn't release files or processes.
I am not sure if the background colour scheme has a specific purpose (easy on the eyes?), but it does look dull.
Demonstrations
I produced an example video showing off some of the basic capabilities of the software - IE, I did not use ChromaKey or Rotoscoping.
Lessons learned (Animation 101)
- Plan ahead - Story boards are useful (Disney use them... so should you)
- Play out the action before videoing it
- Paper moves, there is always a breeze, the dog will jog the table
- Blue-tack and string are lifesavers
- Pauses are necessary and important - Nothing moves continually
- Play back the video multiple times before recording the audio track
Conclusions
Upside
- Simple - Anyone can use this and get good results
- Immediate - You can see what you have done immediately
- Responsive - Help files are good, and so is "What does this do" help
Downside
- Interface background looks a little dull
- Locked twice
Review Style
This review is intended to highlight the benefits and limitations of the item(s) under review, not provide details on how to use it.
Where notes on use are provided, these are the reviewers observations at the time of review and may not necessarily represent the best, easiest, recommended or proper use of the items.
Review images \ videos and capture devices
Where images and screenshots are provided, they were taken by the reviewer unless explicitly stated otherwise.
Any source video and still images were captured on any of the following devices:
Samsung Galaxy S4
- Model GT-I9505
- OS Stock Android - 4.3
- Video 1920 x 1080, stabilised, 25+ fps, MP4
- Images 4128 x 2322, stabilised, JPEG
Sony α 580 DSLR
- Video 1440 x 1080, 25 fps, MP4 or AVCHD
- Images 4912 x 3264, non-stabilised, RAW, JPG
Logitech QuickCam Pro 9000
Firmware 2.96.6009
Driver 13.51.823.0
